uni-app(神领物流)项目实战 - 第4天
学习目标:
能够独立完成任务提货、异常上报、在途的功能
能够使用 uniCloud 实现上传文件到云存储的功能
能够配置地图服务平台的 Key 获取地址理位置
能够使用 uni-file-picker 和 uni-popup 扩展组件
一、【神领物流】任务
继续来开发任务模块剩下的其它功能。
1.1 延迟提货
在司机接收到运输任务后,可以根据自身的情况调整去现场提货的时间,但是要提交申请并说明延迟提货的原因,即延迟提货的功能。
1.1.1 获取参数
延迟提货的操作入口在【任务详情】页面当中,在跳转到延迟提货页面时地址携带的参数为当前【任务的 ID】 和【原计划提货的时间】。
<!-- pages/subpkg_task/detail.vue -->
<script setup>
  // ...
</script>
<template>
	<view class="page-container">
    ...
    <view class="toolbar" v-if="taskDetail.status === 1">
      <navigator
        :url="`/subpkg_task/delay/index?id=${taskDetail.id}&planDepartureTime=${taskDetail.planDepartureTime}`"
        hover-class="none"
        class="button secondary"
      >
        延迟提货
      </navigator>
      <navigator
        :url="`/subpkg_task/pickup/index?id=${taskDetail.id}`"
        hover-class="none"
        class="button primary"
      >
        提货
      </navigator>
    </view>
  </view>
</template>
接下来到延迟提货页面获取地址中传递的参数
<!-- subpkg_task/delay/index.vue -->
<script setup>
  import { ref } from 'vue'
  import { onLoad } from '@dcloudio/uni-app'

  // 原计划提货时间
  const planDepartureTime = ref('')
  // 延迟提货任务的ID
  const id = ref('')

  // 获取地址上的参数
  onLoad((query) => {
    // 原计划提货时间
    planDepartureTime.value = query.planDepartureTime
    // 延迟提货任务的ID
    id.value = query.id
  })
</script>

<template>

</template>
1.1.2 表单数据
表单数据有两个,分别为【延迟时间】和【延迟的原因】
- 延迟时间
用户在填写延迟时间时用到是内置组件 picker 将其 mode 属性指定为 time,用户进行选择后会触发 change 事件,监听该事件即可得到用户选择的时间。
<!-- subpkg_task/delay/index.vue -->
<script setup>
  import { ref } from 'vue'
  import { onLoad } from '@dcloudio/uni-app'

  // 省略中间部分代码...

  // 延迟提货时间
  const delayTime = ref('')

 	// 省略中间部分代码...

  // 监听用户选择时间
  function onPickerChange(ev) {
    // 延迟提货时间,需要拼接日期
    const [date] = planDepartureTime.value.split(' ')
    delayTime.value = `${date} ${ev.detail.value}`
  }
</script>
<template>
  <view class="page-container">
			...
      <uni-list-item title="延迟时间" showArrow>
        <template v-slot:footer>
          <picker @change="onPickerChange" class="time-picker" mode="time">
            <text v-if="!delayTime">不可超过2个小时</text>
            <text v-else>{{ delayTime + ':00' }}</text>
          </picker>
        </template>
      </uni-list-item>
			...
  </view>
</template>
在上述代码中需要注意时间的拼凑方式:
- 日期部分要与原计划提货日期对应,原因在于只能延迟提货2个小时,所以必然在同一天当中
- 延迟原因
直接使用 v-model 来获取即可,除了获取数据还需要对字数进行统计
<!-- subpkg_task/delay/index.vue -->
<script setup>
  import { ref } from 'vue'
  import { onLoad } from '@dcloudio/uni-app'

  // 省略中间部分代码...

  // 延迟原因
  const delayReason = ref('')

 	// 省略中间部分代码...

</script>

<template>
  <view class="page-container">
    	...
      <uni-list-item direction="column">
        <template v-slot:body>
          <view class="textarea-wrapper">
            <textarea
              class="textarea"
              v-model="delayReason"
              placeholder-style="color: #818181"
              placeholder="请输入延迟提货原因"
            ></textarea>
            <text class="words-count">0/50</text>
          </view>
        </template>
      </uni-list-item>
      ...
  </view>
</template>
通过计算属性来统计延迟原因的字数
<!-- subpkg_task/delay/index.vue -->
<script setup>
  import { ref, computed } from 'vue'
  import { onLoad } from '@dcloudio/uni-app'

  // 省略中间部分代码...

  // 延迟原因
  const delayReason = ref('')
  // 统计输入的字数
  const wordsCount = computed(() => delayReason.value.length)

 	// 省略中间部分代码...

</script>

<template>
  <view class="page-container">
    	...
      <uni-list-item direction="column">
        <template v-slot:body>
          <view class="textarea-wrapper">
            <textarea
              class="textarea"
              v-model="delayReason"
              placeholder-style="color: #818181"
              placeholder="请输入延迟提货原因"
            ></textarea>
            <text class="words-count">{{ wordsCount }}/50</text>
          </view>
        </template>
      </uni-list-item>
      ...
  </view>
</template>
- 数据验证
通过计算属性来验证填写的数据是否符合要求,延迟时不允许超过原计划时间2个小时,延迟原因不超过50个字。
<!-- subpkg_task/delay/index.vue -->
<script setup>
  import { ref, computed } from 'vue'
  import { onLoad } from '@dcloudio/uni-app'

  // 省略中间部分代码...

  // 延迟提货时间
  const delayTime = ref('')
  // 验证延迟时间
  const delayTimeValid = computed(() => {
    // 延迟时间不超过2小时
    const start = new Date(planDepartureTime.value)
    const end = new Date(delayTime.value)
    // 时间差区间在 0 ~ 7200 * 1000 毫秒
    return end - start > 0 && end - start < 7200 * 1000
  })

  // 延迟原因
  const delayReason = ref('')
  // 统计输入的字数
  const wordsCount = computed(() => delayReason.value.length)
  // 验证延迟原因
  const delayReasonValid = computed(() => {
    return wordsCount.value <= 50 && wordsCount.value > 0
  })

 	// 省略中间部分代码...

</script>

<template>
  <view class="page-container">
    	...
      <uni-list-item title="延迟时间" showArrow>
        <template v-slot:footer>
          <picker @change="onPickerChange" class="time-picker" mode="time">
            <text v-if="!delayTime">不可超过2个小时</text>
            <text :class="{ error: !delayTimeValid }">{{ delayTime + ':00' }}</text>
          </picker>
        </template>
      </uni-list-item>
      <uni-list-item direction="column">
        <template v-slot:body>
          <view class="textarea-wrapper">
            <textarea
              class="textarea"
              v-model="delayReason"
              placeholder-style="color: #818181"
              placeholder="请输入延迟提货原因"
            ></textarea>
            <text :class="{ error: wordsCount > 50 }" class="words-count">
              {{ wordsCount }}/50
            </text>
          </view>
        </template>
      </uni-list-item>
      ...
  </view>
</template>
1.1.3 提交数据
接下来需要调用接口来提交表单数据,接口文档的详细说明在这里。
- 禁用/开启表单提交,如果表单验证未通过时不允许用户点击按钮来提交表单
<!-- subpkg_task/delay/index.vue -->
<script setup>
  import { ref, computed } from 'vue'
  import { onLoad } from '@dcloudio/uni-app'

  // 省略中间部分代码...

  // 是否允许提交表单
  const enableSubmit = computed(() => {
    return !delayReasonValid.value || !delayTimeValid.value
  })

 	// 省略中间部分代码...

</script>

<template>
  <view class="page-container">
    	...
      <uni-list-item :border="false">
        <template v-slot:body>
          <button :disabled="enableSubmit" class="button">提交</button>
        </template>
      </uni-list-item>
      ...
  </view>
</template>
- 封装调用接口的方法
// apis/task.js
export default {
  // 省略中间部分代码...

  /**
   * 延迟提货
   * @param {Object} data - 接口参数
   */
  delay(data) {
    if(!data.id) return
    return uniFetch.put('/driver/tasks/delay', data);
  },
}
- 调用接口提交数据
<!-- subpkg_task/delay/index.vue -->
<script setup>
  import { ref, computed } from 'vue'
  import { onLoad } from '@dcloudio/uni-app'
  import taskApi from '@/apis/task'

  // 省略中间部分代码...

  async function onSubmitForm() {
    // 待提交的表单数据
    const formData = {
      id: id.value,
      delayTime: delayTime.value,
      delayReason: delayReason.value,
    }
    const { code } = await taskApi.delay(formData)
    // 检测接口是否调用成功
    if (code !== 200) return uni.utils.toast('提交数据失败,稍后重试!')
    // 跳转到任务列表
    uni.reLaunch({ url: '/pages/task/index' })
  }
</script>

<template>
  <view class="page-container">
    	...
      <uni-list-item :border="false">
        <template v-slot:body>
          <button @click="onSubmitForm" :disabled="enableSubmit" class="button">
            提交
          </button>
        </template>
      </uni-list-item>
      ...
  </view>
</template>
知识点🚩:
关于uni.reLaunch补充
- navigateTo 是不断向路由添加新的页面
- redirectTo 跳转的页面会覆盖当前的页面
- reLaunch 杀掉所有页面,让当前页面置顶
1.2 提货
司机到现场提货完成后需要上传相关的单据和现场货品的照片,即本小节要实现的功能,在本节上传图片会用到 uniCloud 提供的云开发服务。
uni-app 提供了文件上传的扩展组件 uni-file-picker,通过该组件可以轻松的将图片上传到云空间,在使用 uni-file-picker 组件之前先来开通免费的云空间。
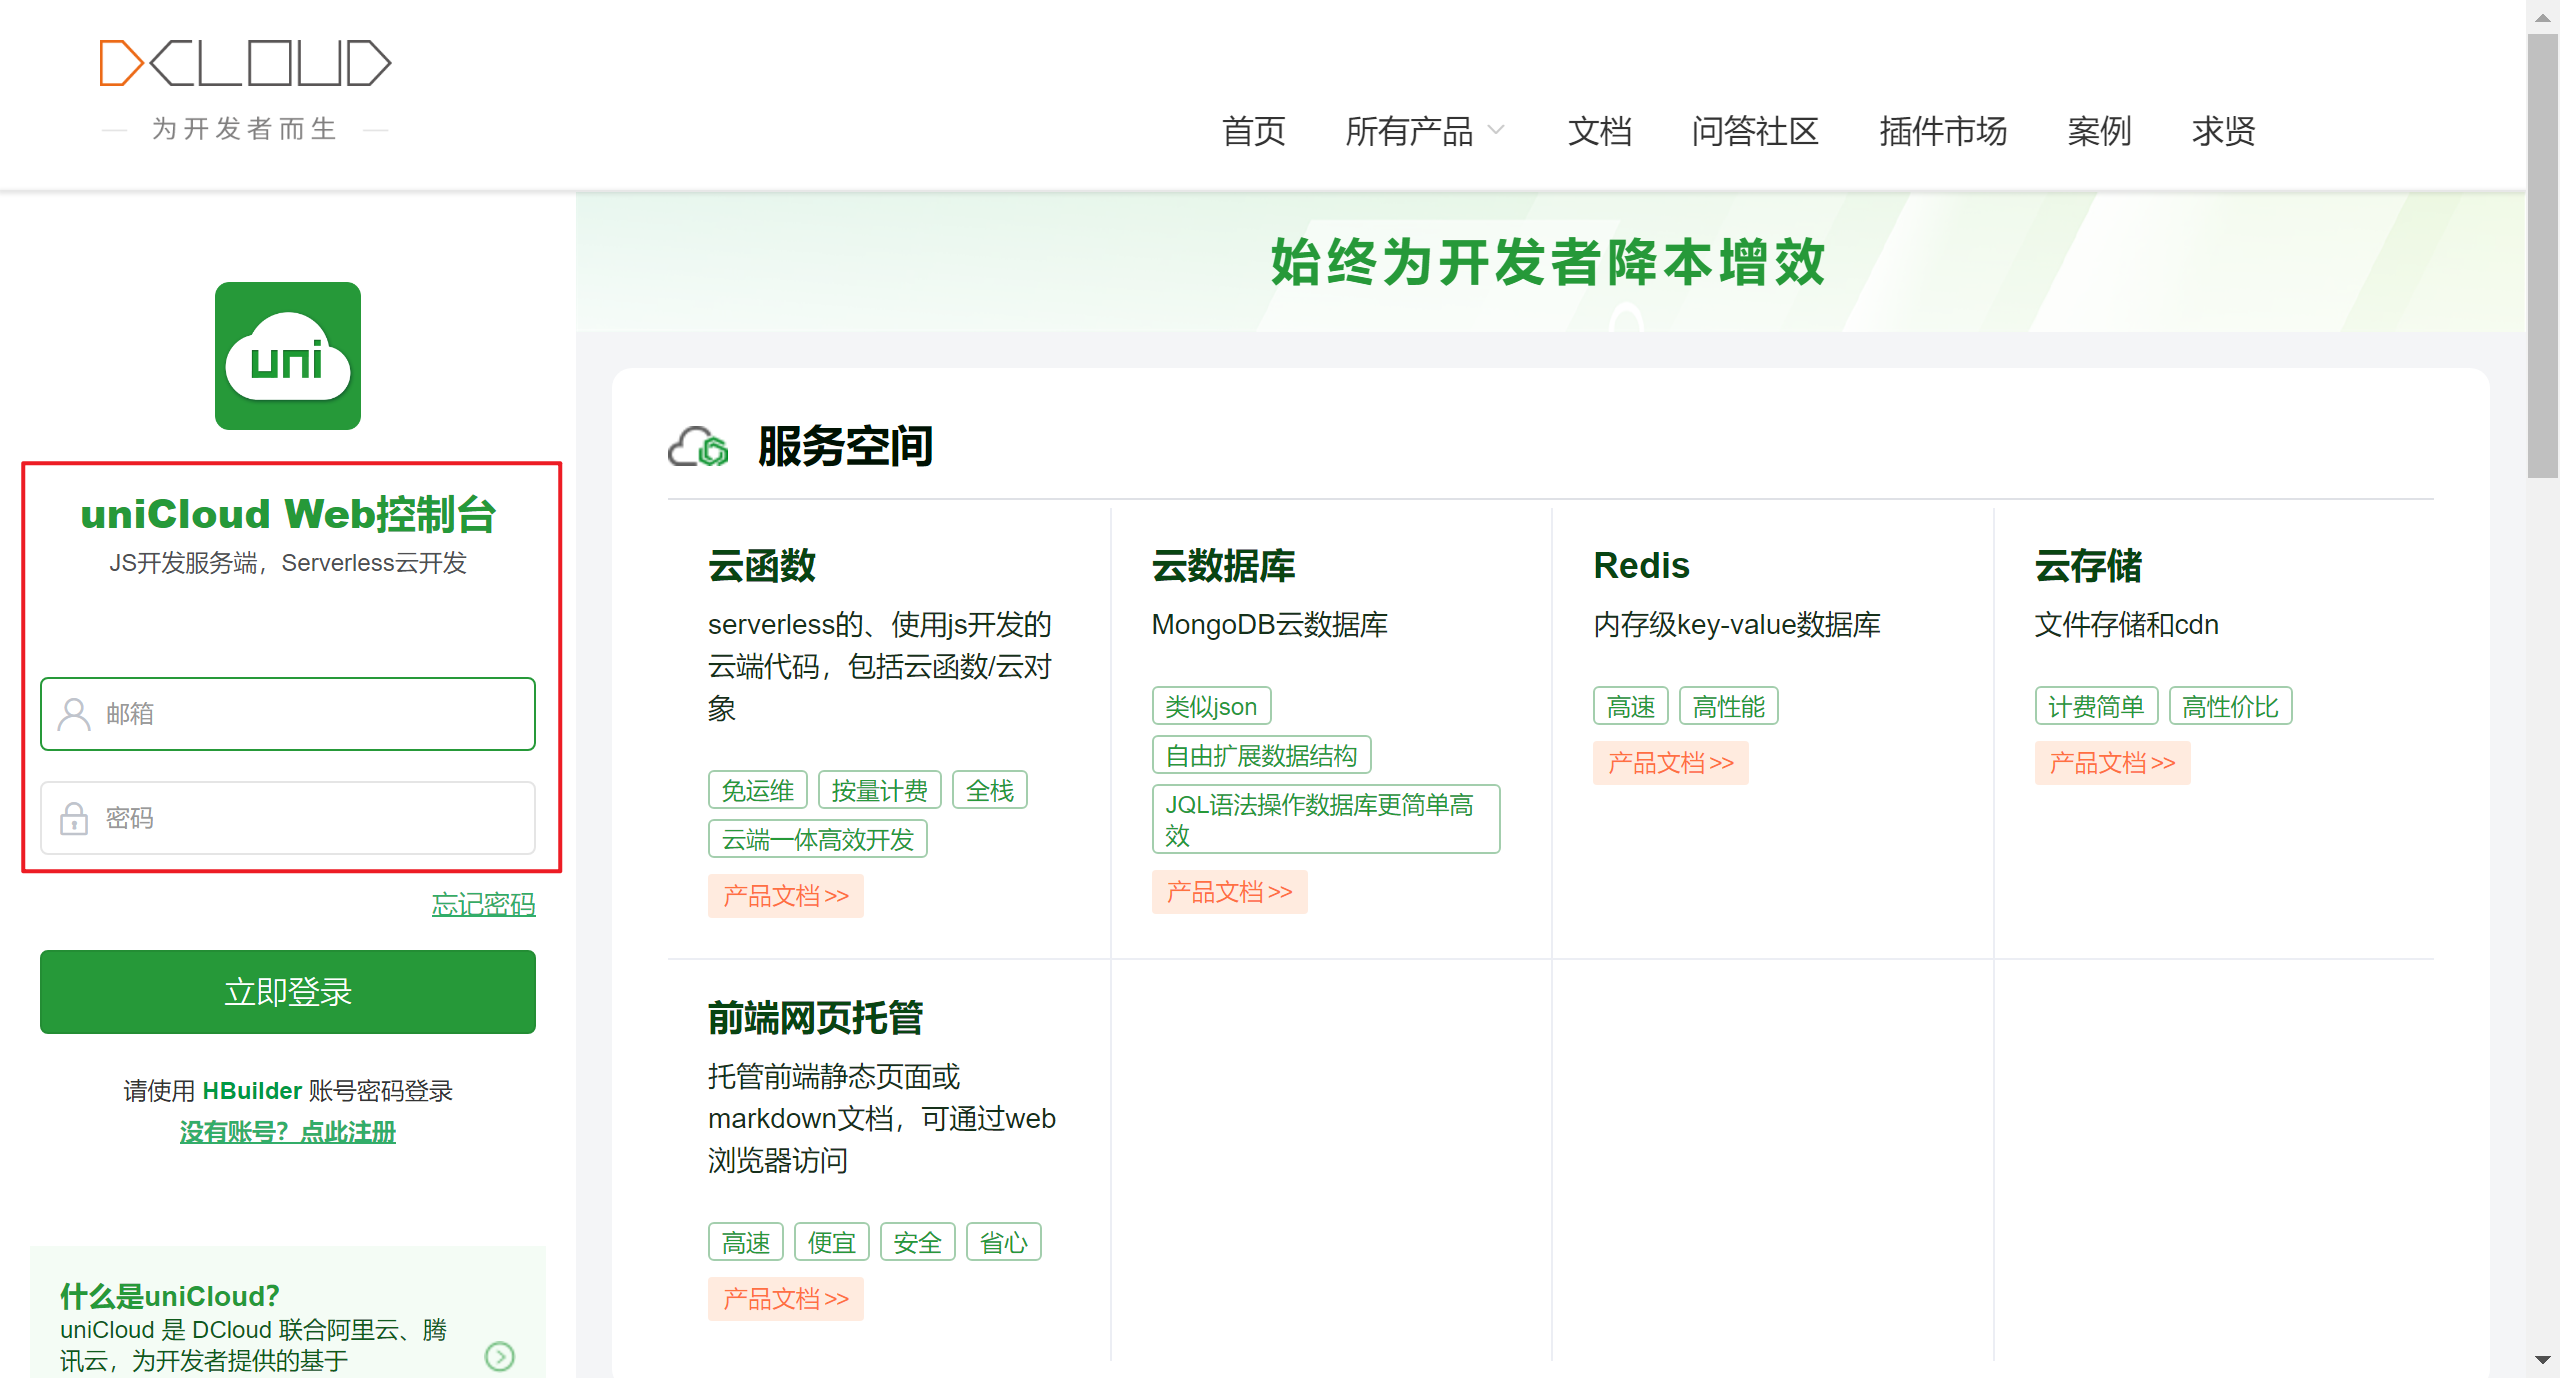
1.2.1 uniCloud
- 使用注册前面课程中注册好的账号来登录 uniCloud 的控制台
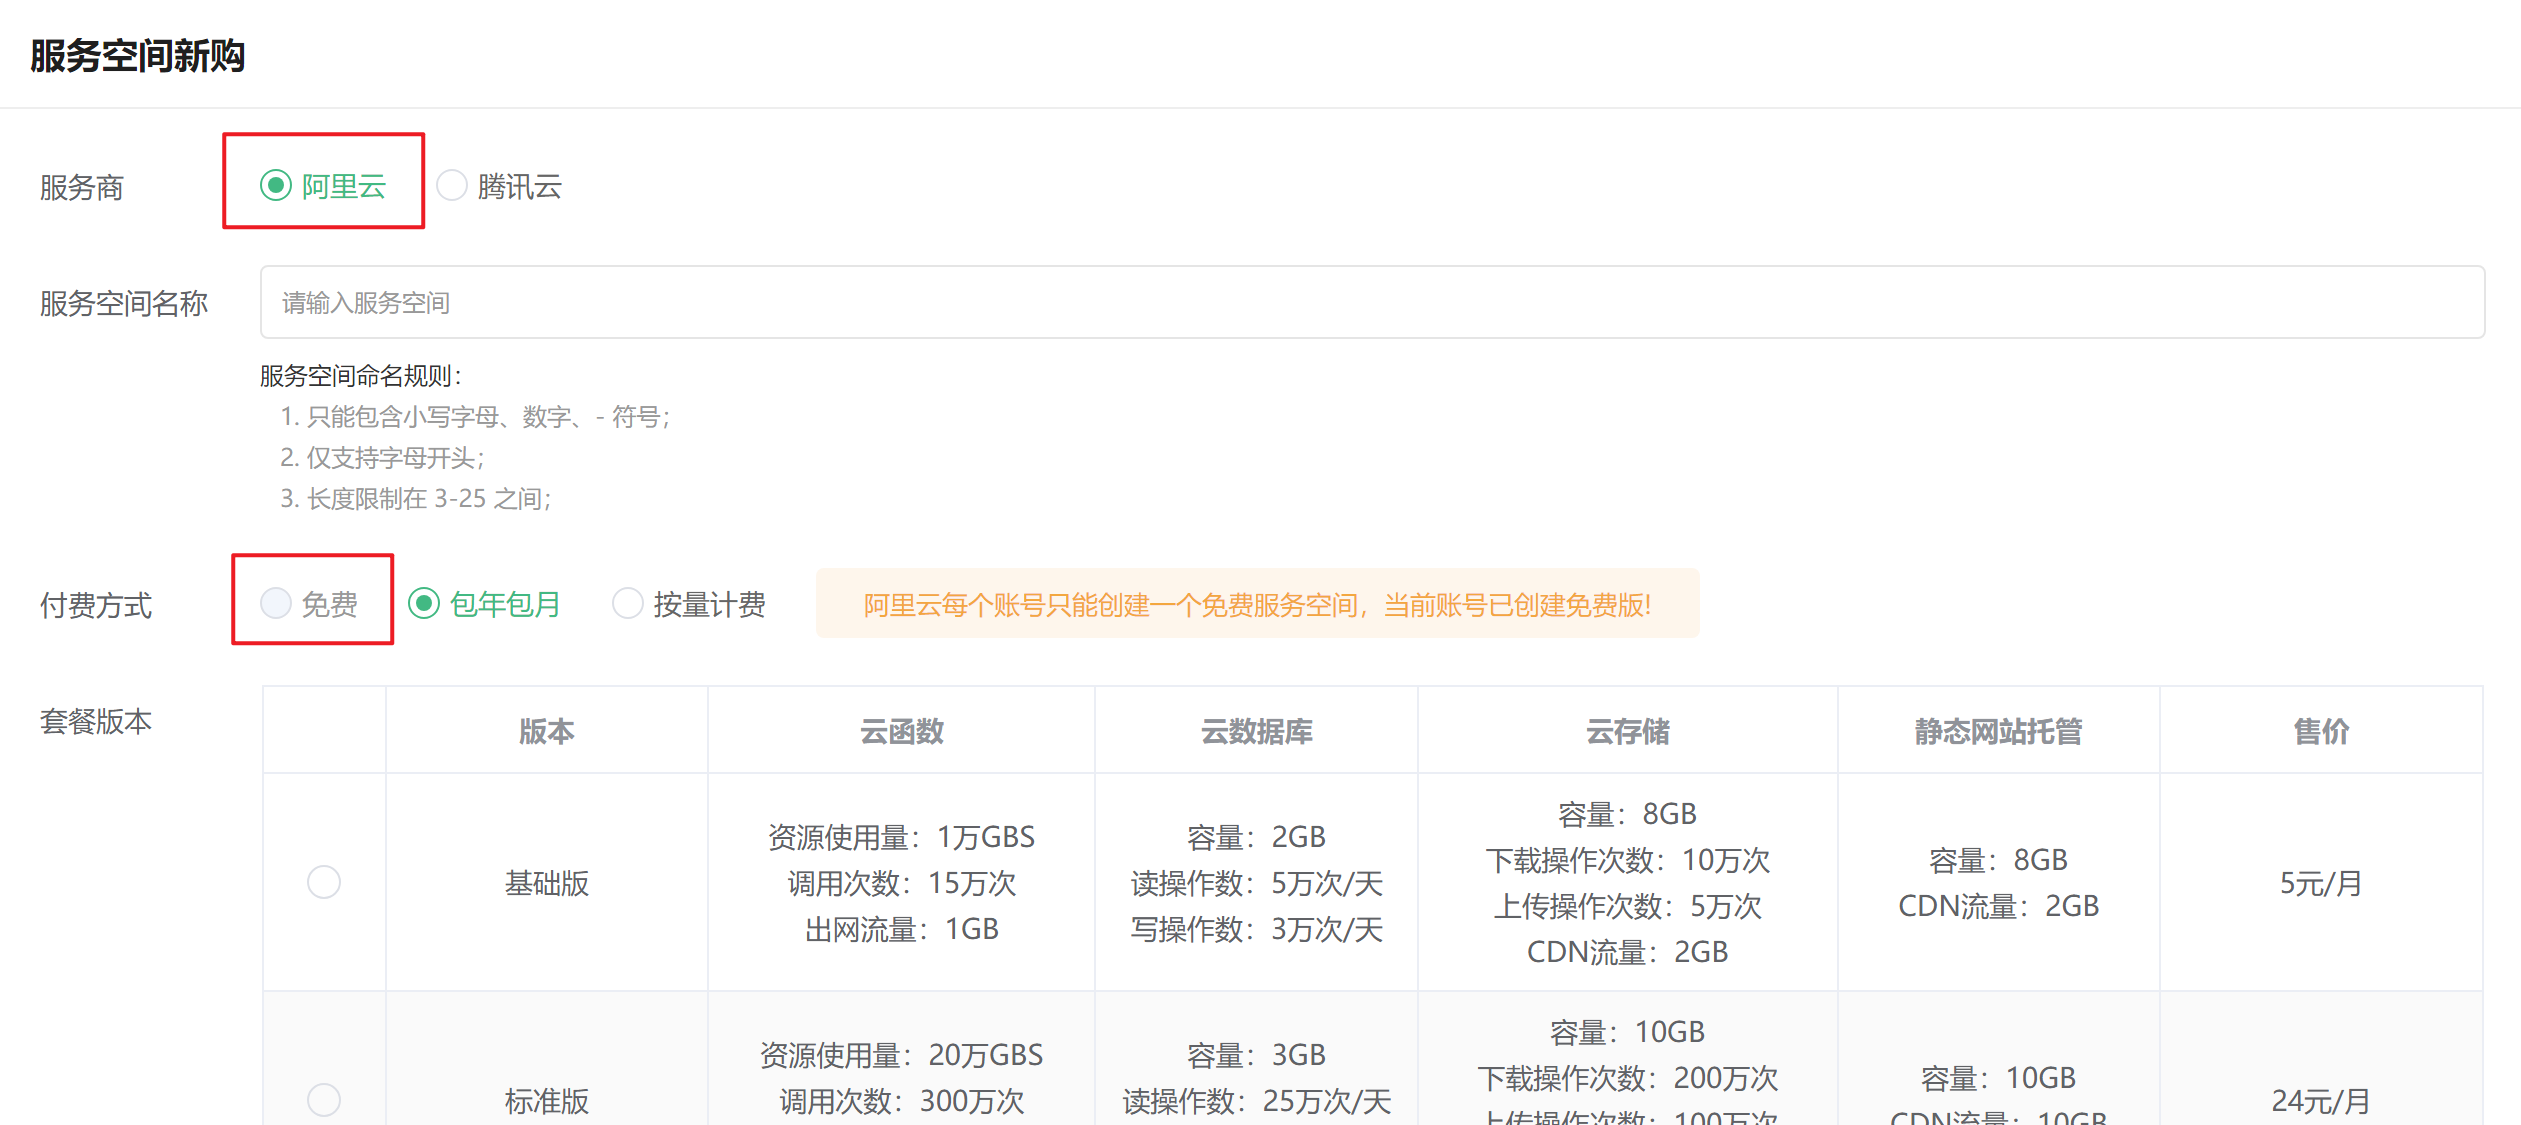
- 新建服务空间
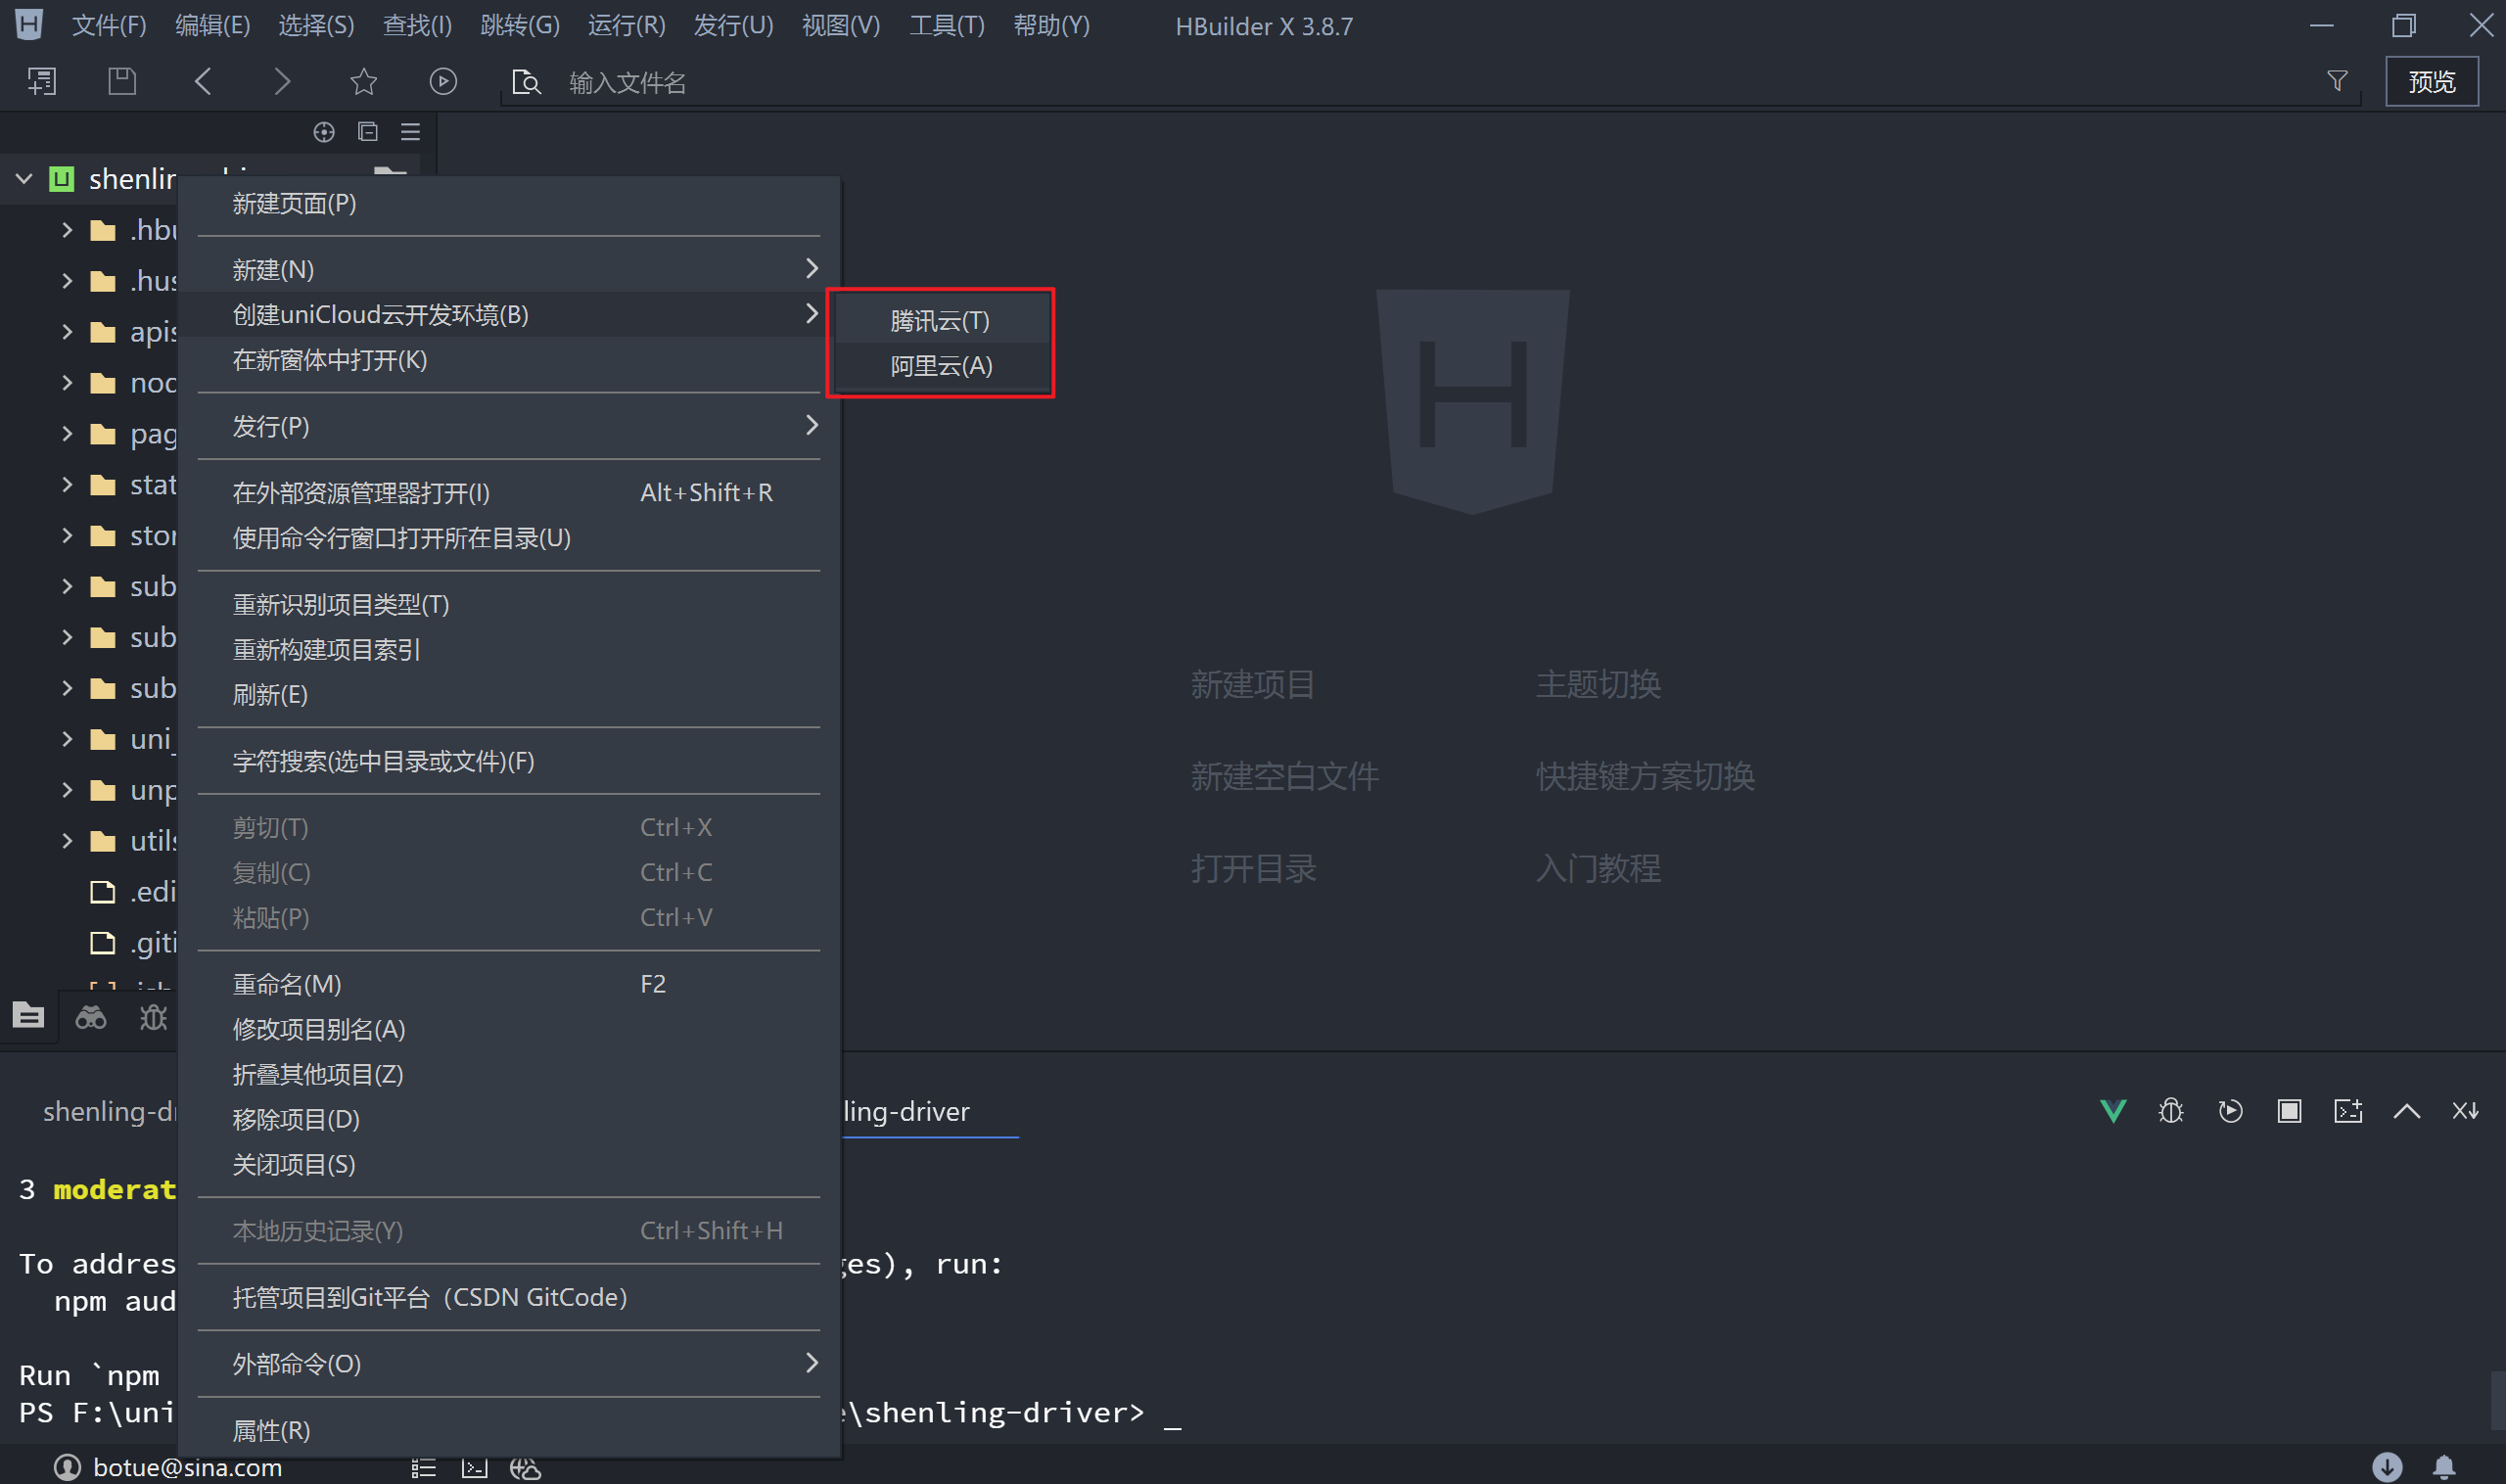
- 新建 uniCloud 开发环境
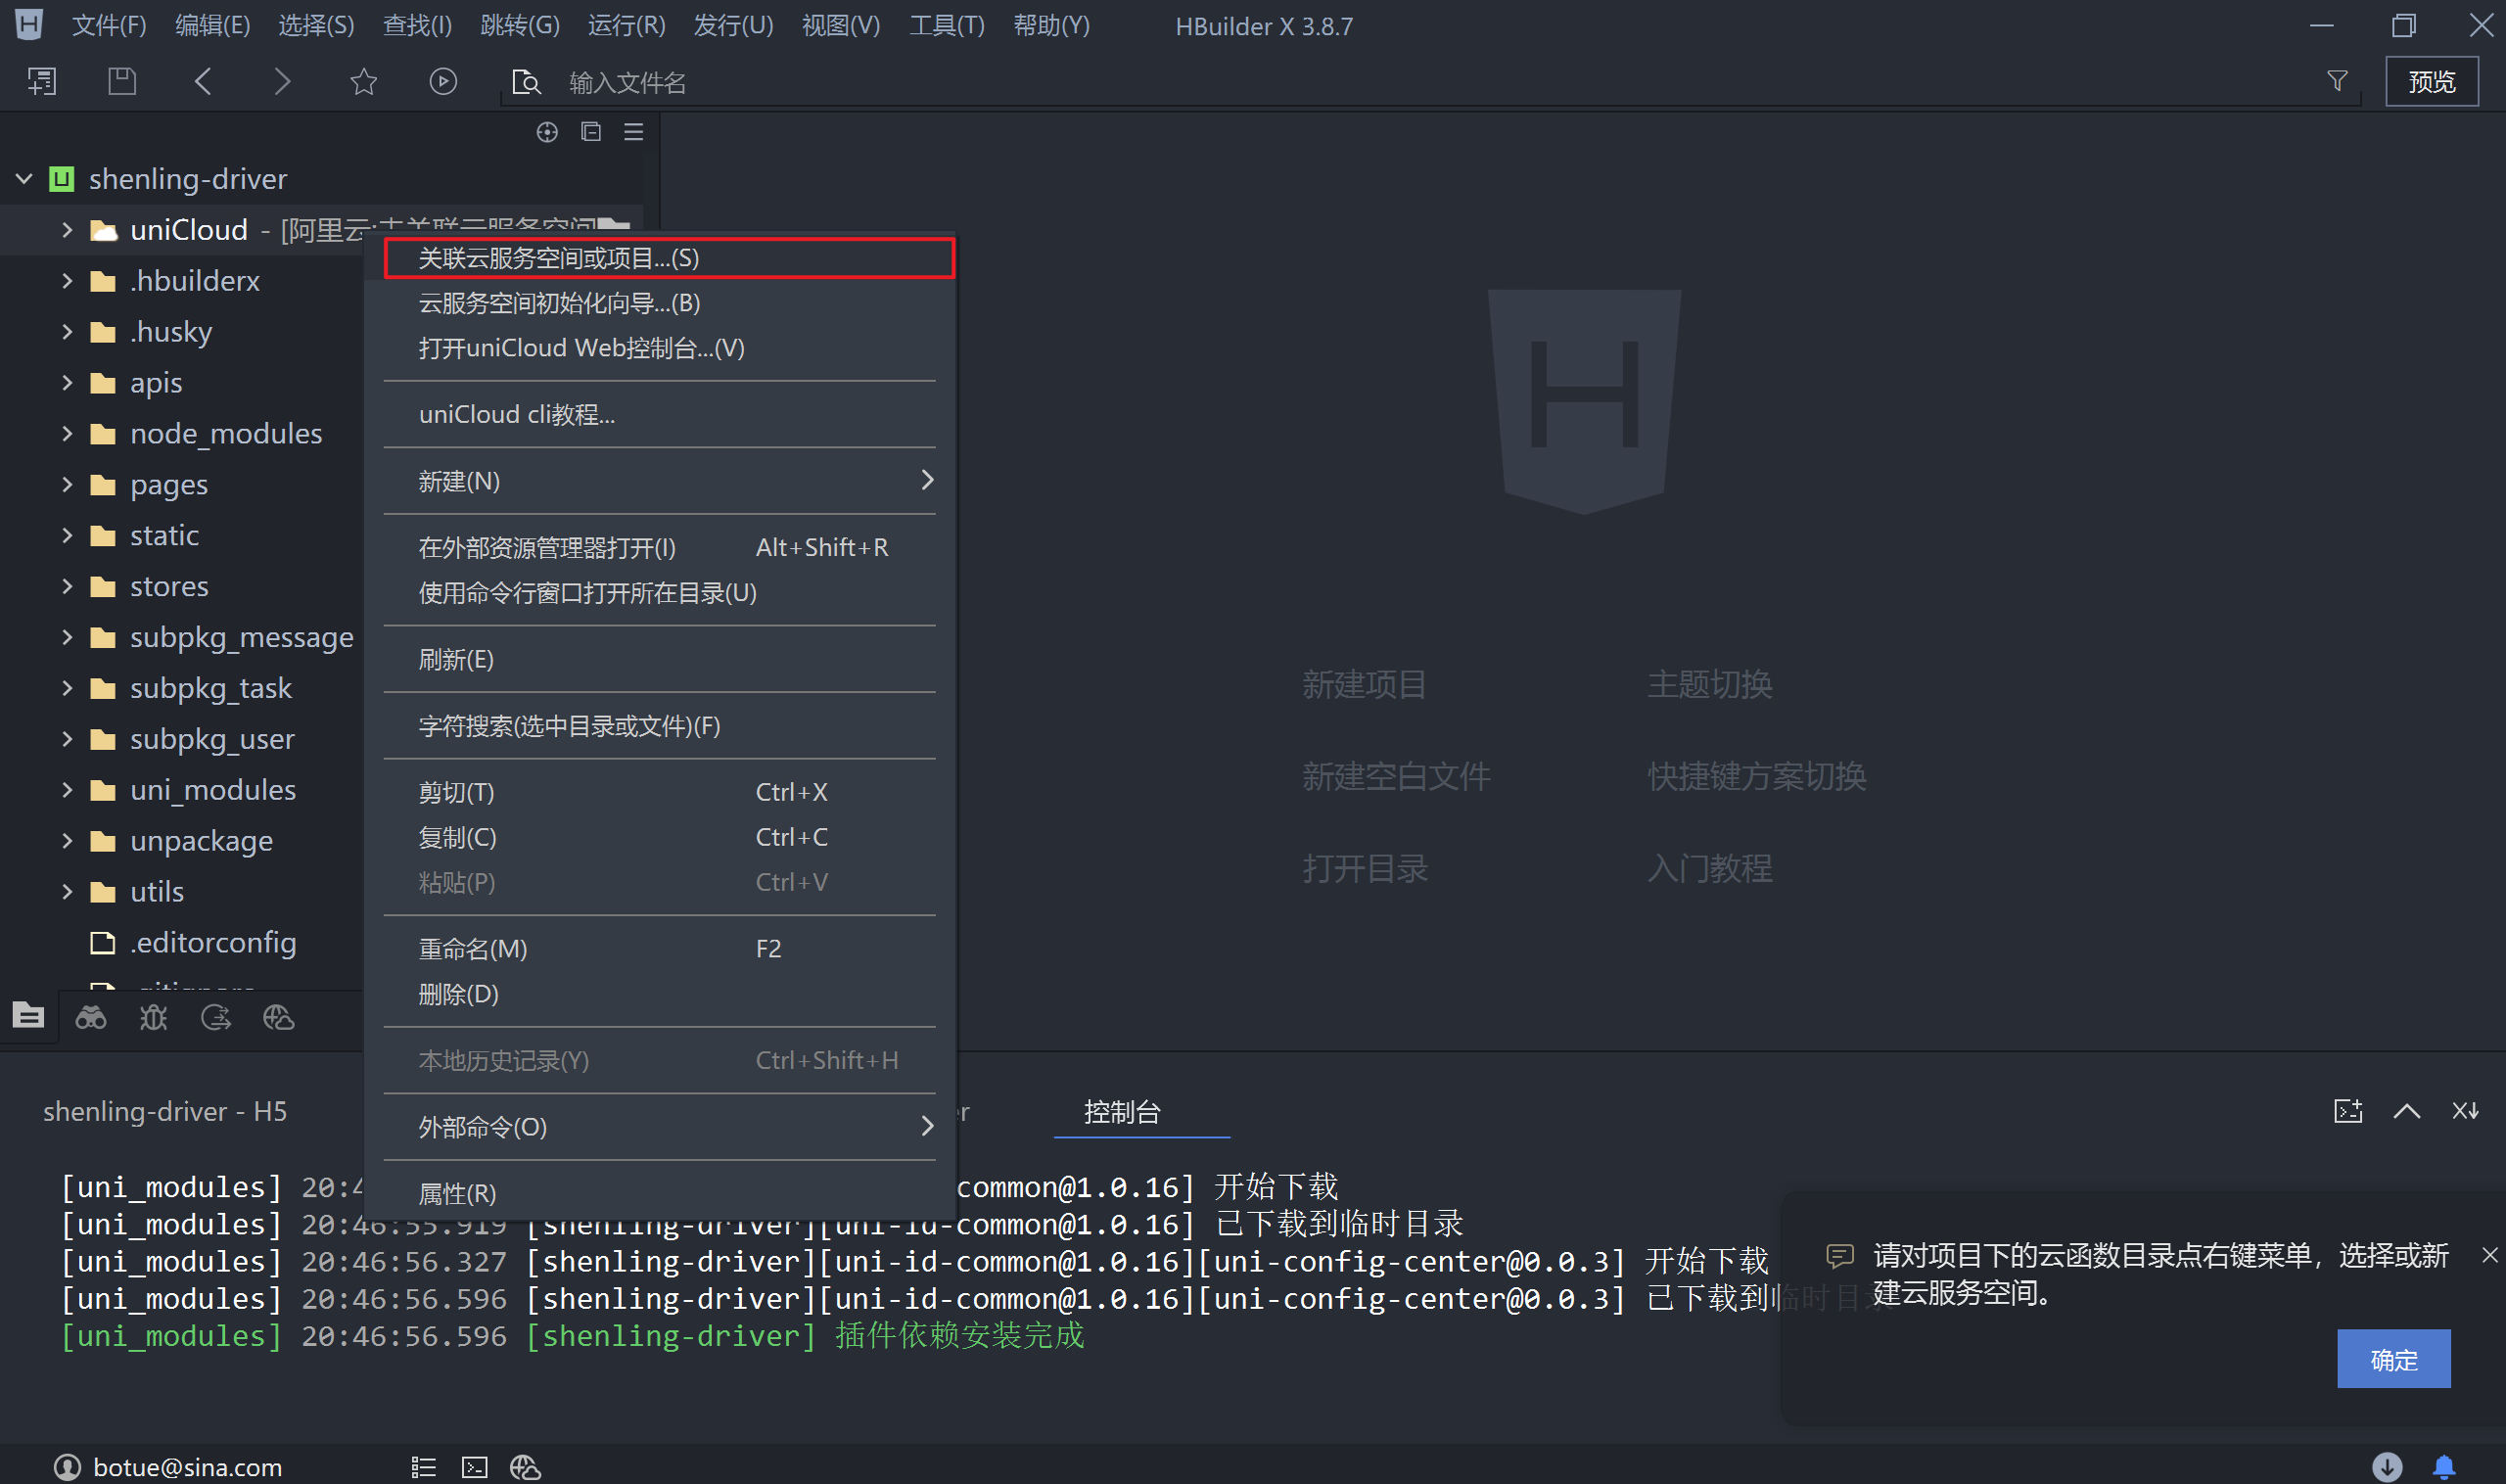
刷新项目,目录新增uniCloud-xxx文件夹
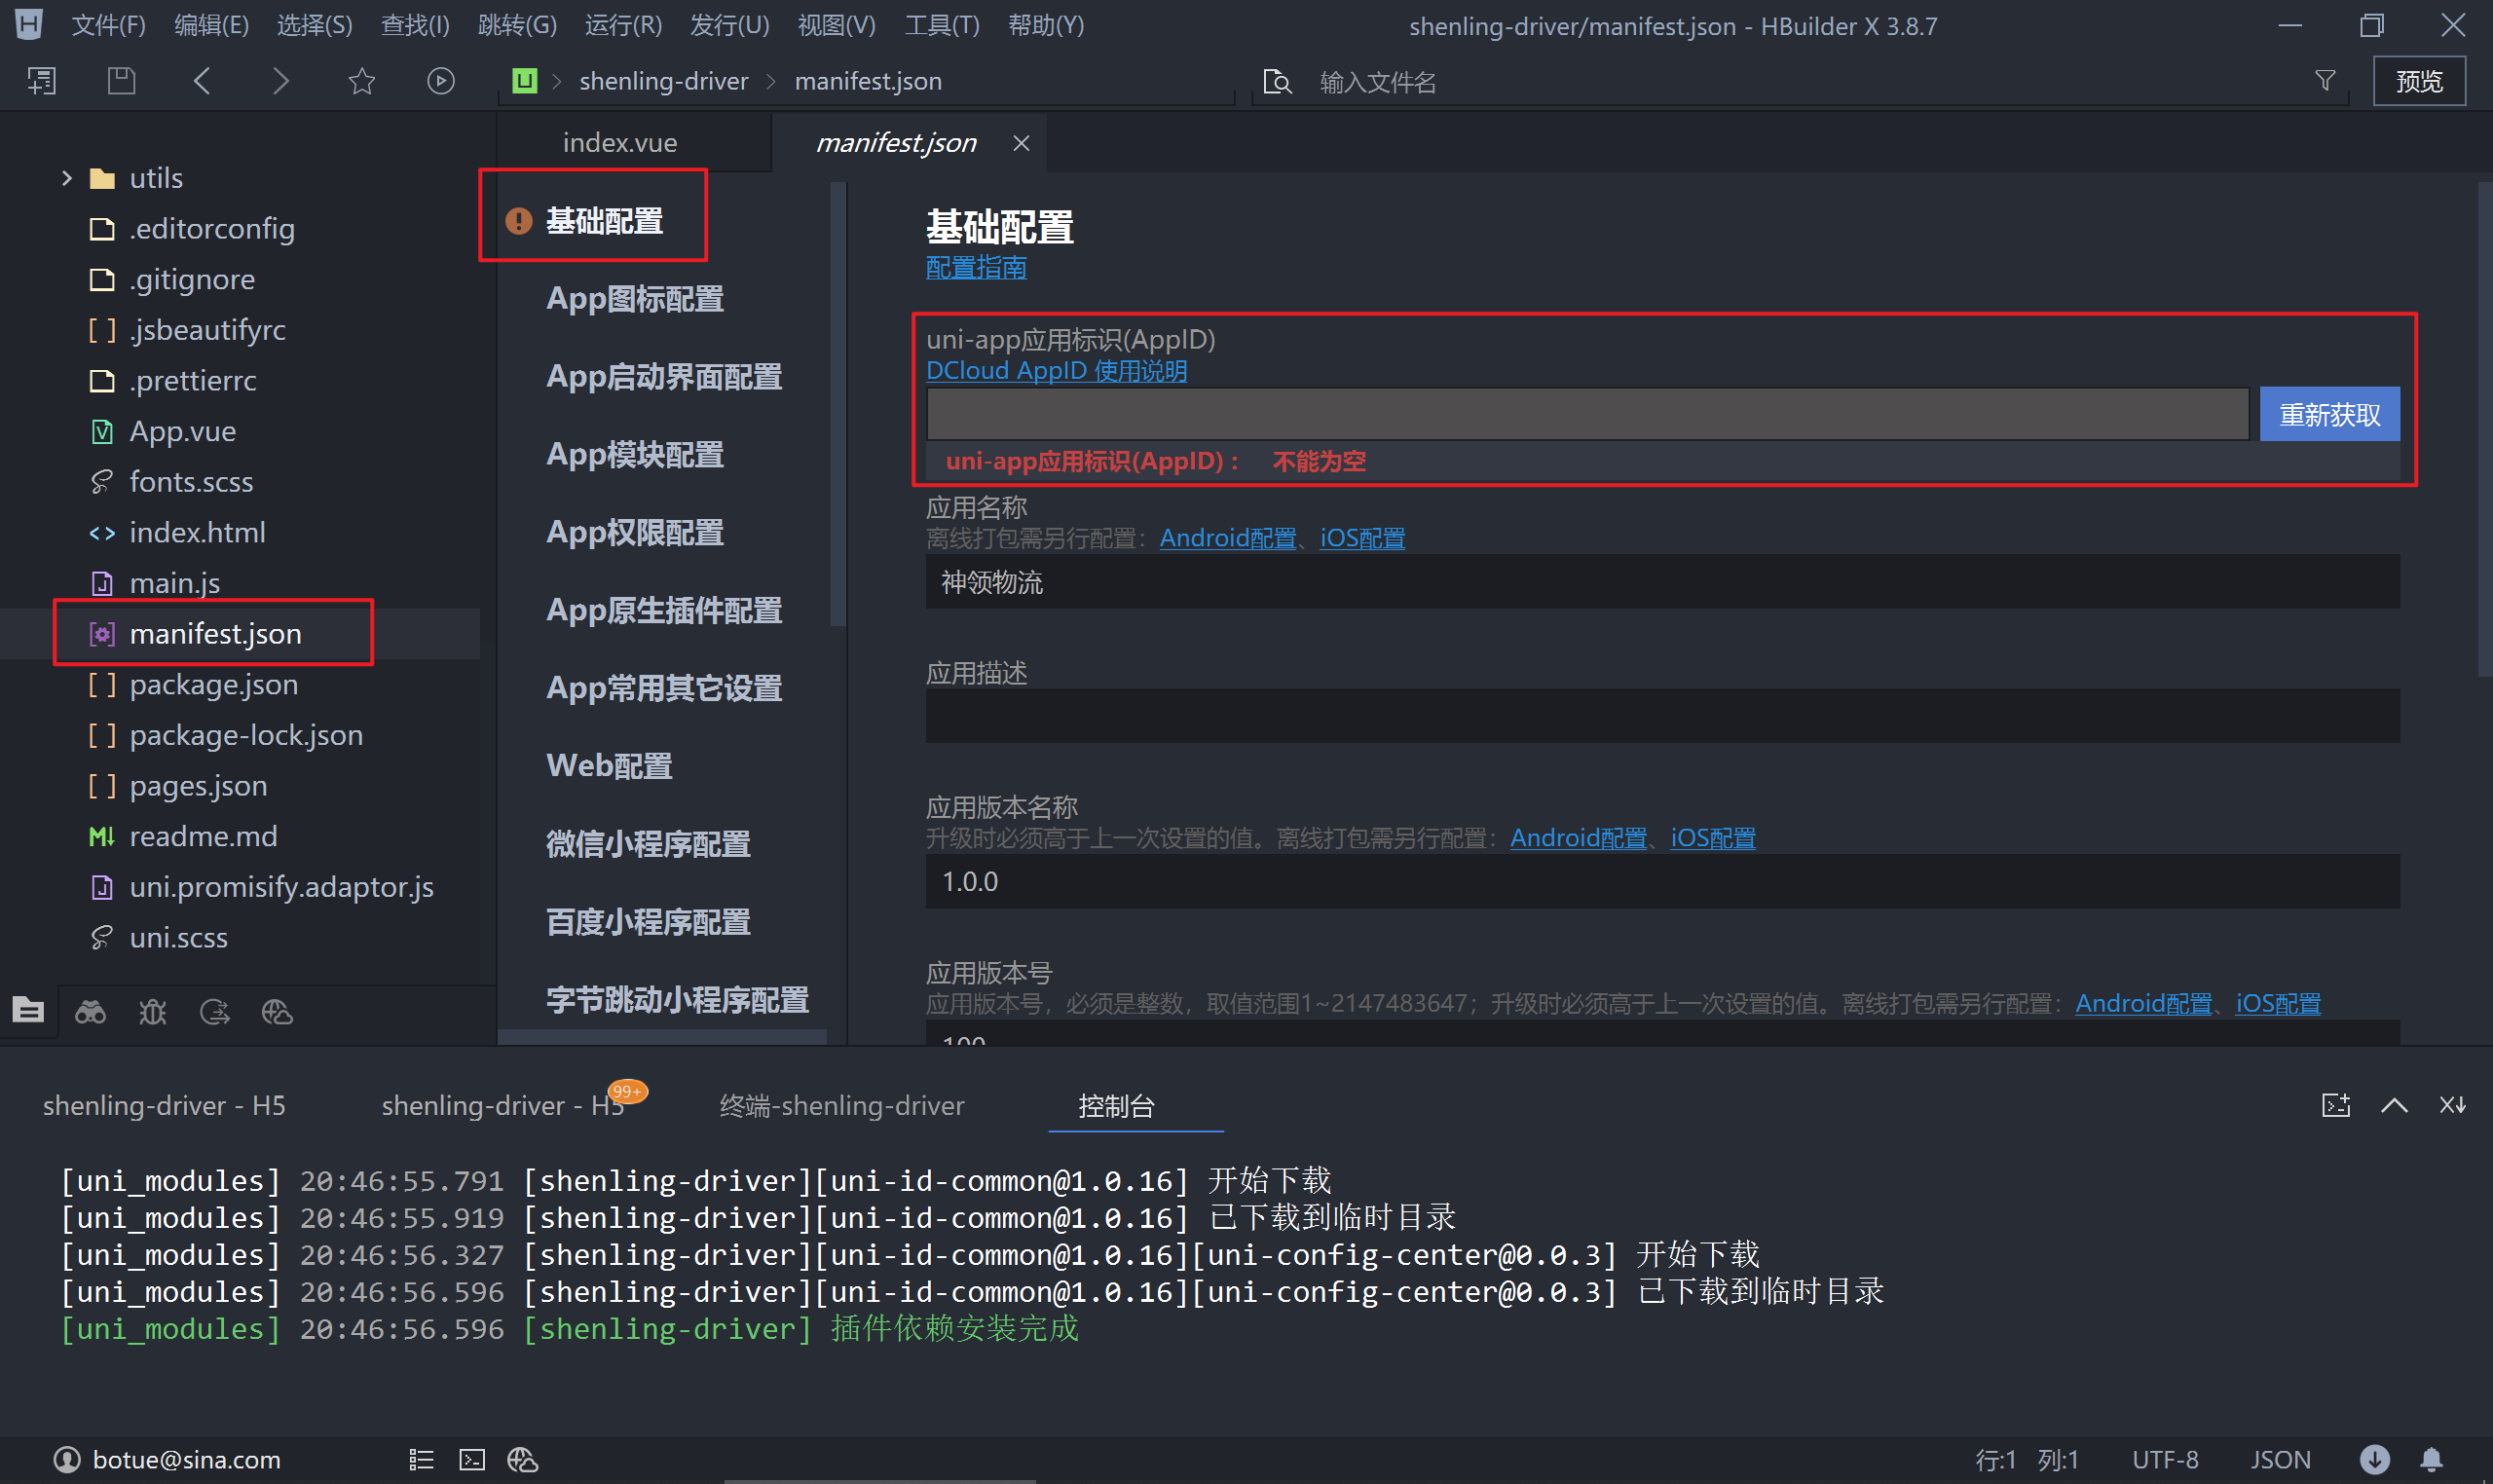
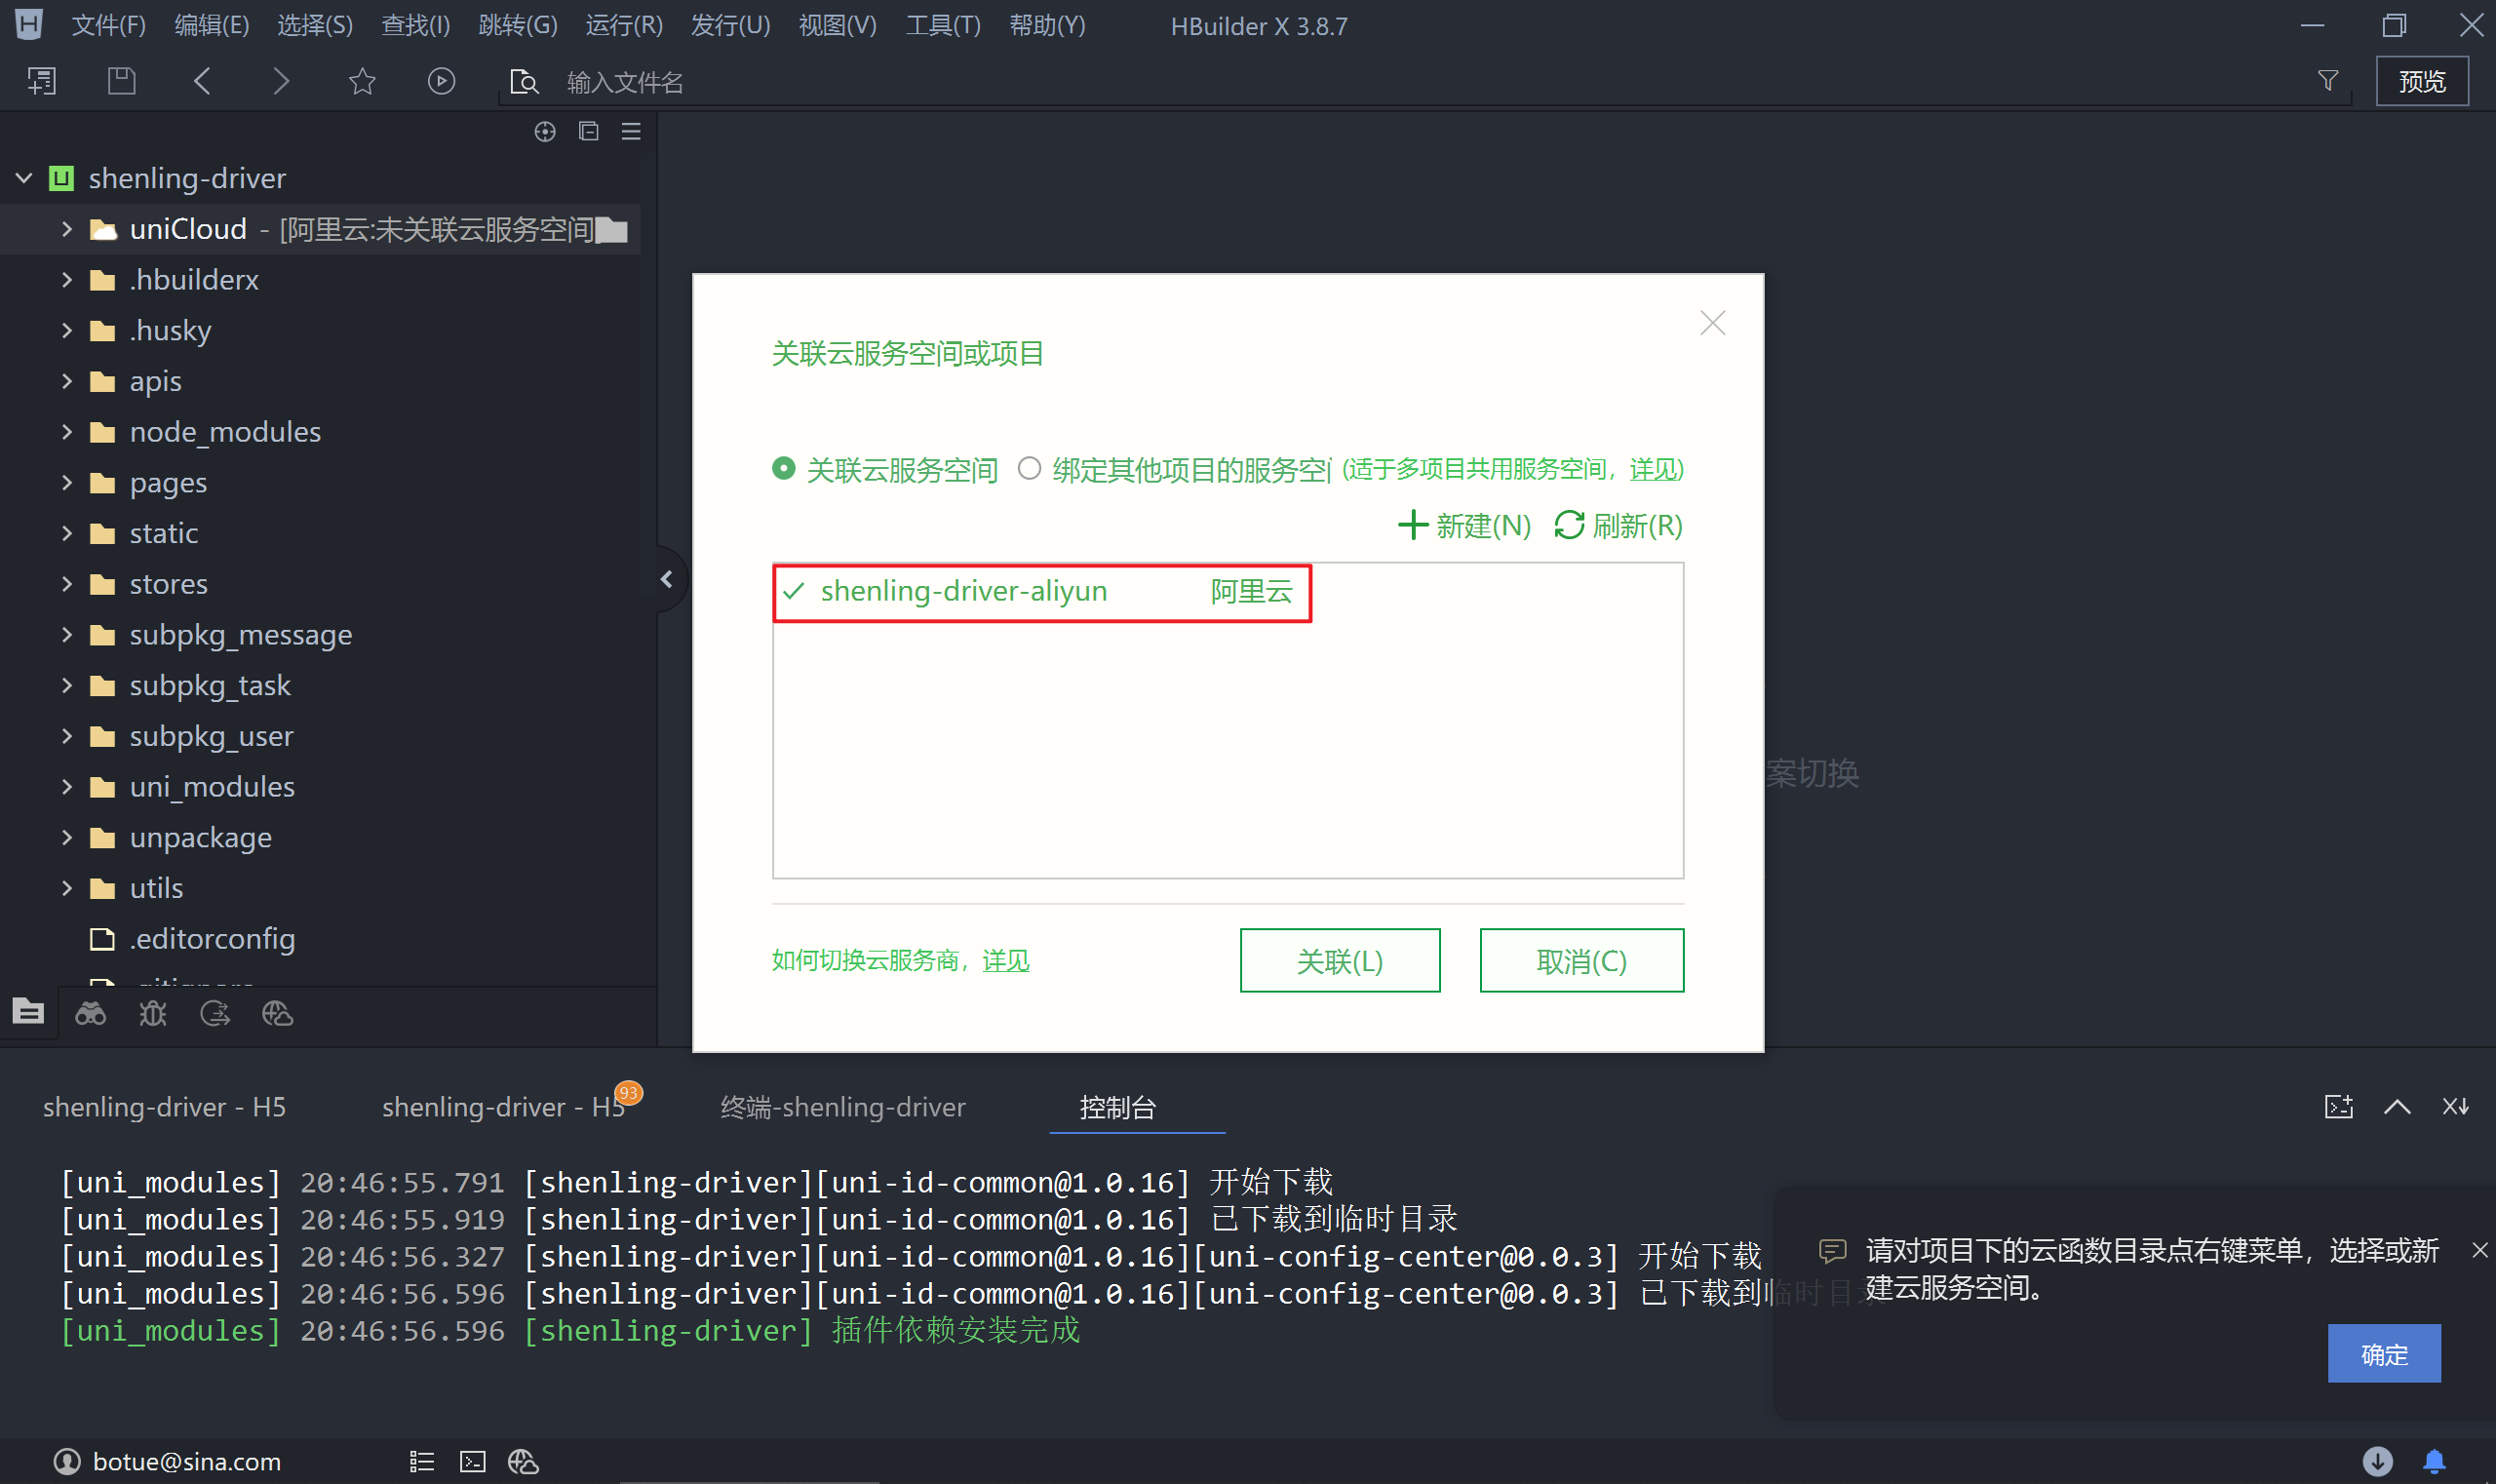
- 关联服务空间
如果,提示没有AppId
- 获取 AppID
选择云空间
- 重新启动项目,!!!非常重要!!!
1.2.2 uni-file-picker
uni-file-picker 是 uni-app 的扩展组件,用于实现文件上传的功能。
<!-- subpkg_task/pickup/index.vue -->
<script setup>
  import { ref } from 'vue'

	// "https://mp-664d2554-cfa5-4427-9adf-d14025991d5f.cdn.bspapp.com/cloudstorage/40edf9ed-9f29-48b7-ab29-425abe351dea.jpg"

  // 提货凭证图片
  const receiptPictrues = ref([])
  // 货品图片
  const goodsPictrues = ref([])

</script>
<template>
  <view class="page-container">
    <view class="receipt-info">
      <uni-file-picker
        v-model="receiptPictrues"
        file-extname="jpg,webp,gif,png"
        limit="3"
        title="请拍照上传回单凭证"
      ></uni-file-picker>
      <uni-file-picker
        file-extname="jpg,webp,gif,png"
        limit="3"
        title="请拍照上传货品照片"
      ></uni-file-picker>
    </view>
    <button disabled class="button">提交</button>
  </view>
</template>
title属性定义标题用于提示上传文件的内容limit限制上传文件的数量file-extname限制上传文件的类型v-model用于回显上传的图片@success上传成功的回调(了解即可)@fail上传失败的回调(了解即可)
1.2.3 数据验证
每种类型的图片最少1张,最多3张图片,通过计算属性来进行验证。
<!-- subpkg_task/pickup/index.vue -->
<script setup>
  import { ref, computed } from 'vue'

  // 省略中间部分代码...

  // 数据验证
  const enableSubmit = computed(() => {
    return goodsPictrues.value.length > 0 && receiptPictrues.value.length > 0
  })
</script>
<template>
  <view class="page-container">
    ...
    <button :disabled="!enableSubmit" class="button">提交</button>
  </view>
</template>
1.2.4 提交表单
将上传到云空间的图片地址发送给后端接口,详细接口说明文档在这里。
- 准备表单数据
- 任务ID是通地址参数传递的
cargoPickUpPictureList数组只包含url属性cargoPictureList数组只包含url属性
<!-- subpkg_task/pickup/index.vue -->
<script setup>
  import { ref, computed } from 'vue'
  import { onLoad } from '@dcloudio/uni-app'

  // 任务ID
  const id = ref('')
  // 提货凭证图片
  const receiptPictrues = ref([])
  // 数据二次处理,只保留 url 属性
  const cargoPickUpPictureList = computed(() => {
    return receiptPictrues.value.map(({ url }) => {
      return { url }
    })
  })

  // 货品图片
  const goodsPictrues = ref([])
  // 数据二次处理,只保留 url 属性
  const cargoPictureList = computed(() => {
    return goodsPictrues.value.map(({ url }) => {
      return { url }
    })
  })

  onLoad((query) => {
    // 获取任务ID
    id.value = query.id
  })

	// 省略中间部分代码...

</script>
<template>
  <view class="page-container">
    ...
    <button :disabled="!enableSubmit" class="button">提交</button>
  </view>
</template>
- 封装接口调用接口的方法
// apis/task.js
export default {
  // 省略中间部分代码...

  /**
   * 提货
   * @property {Object} data - 接口参数
   */
  pickup(data) {
    if (!data.id) return
    return uniFetch.post('/driver/tasks/takeDelivery', data);
  },
}
- 到页面中调用接品提交表单数据
<!-- subpkg_task/pickup/index.vue -->
<script setup>
  import { ref, computed } from 'vue'
  import { onLoad } from '@dcloudio/uni-app'
  import taskApi from '@/apis/task'

	// 省略中间部分代码...

  // 提交表单数据
  async function onSubmitForm() {
    // 表单数据
    const formData = {
      id: id.value,
      cargoPickUpPictureList: cargoPickUpPictureList.value,
      cargoPictureList: cargoPictureList.value,
    }
    const { code } = await taskApi.pickup(formData)
    if (code !== 200) return uni.utils.toast('提交数据失败!')
    // 去到任务列表
    uni.reLaunch({ url: '/subpkg_task/detail/index?id=' + id.value })
  }
</script>
<template>
  <view class="page-container">
    ...
    <button @click="onSubmitForm" :disabled="!enableSubmit" class="button">提交</button>
  </view>
</template>
1.3 在途
司机完成提货后,运输的任务状态即 status 的值会变成 2,获取在途列表的数据时所使用的接口与待提货是相同的,区别是传入的状态值有差异。
1.3.1 任务列表
由于在途,列表不会存在多条数据,所以不需要上拉加载和下拉刷新
<!-- pages/task/components/delivery.vue -->
<script setup>
  import { ref, onMounted } from 'vue'
  import taskApi from '@/apis/task'

  // 在途任务列表
  const deliveryList = ref([])
  // 在途列任务列表是否为空
  const isEmpty = ref(false)

  // 生命周期(获取数据)
  onMounted(() => {
    getDeliveryList()
  })

  // 在途任务列表
  async function getDeliveryList() {
    const { code, data } = await taskApi.list(2)
    if (code !== 200) return uni.utils.toast('在途任务获取失败!')
    // 渲染数据
    deliveryList.value = data.items || []
    isEmpty.value = deliveryList.value.length === 0
  }
</script>
<template>
  <scroll-view scroll-y :refresher-enabled="false" class="scroll-view">
    <view class="scroll-view-wrapper">
      <view
        v-for="delivery in deliveryList"
        :key="delivery.id"
        class="task-card"
      >
        <navigator
          hover-class="none"
          :url="`/subpkg_task/detail/index?id=${delivery.id}`"
        >
          <view class="header">
            <text class="no">任务编号: {{ delivery.transportTaskId }}</text>
          </view>
          <view class="body">
            <view class="timeline">
              <view class="line">{{ delivery.startAddress }}</view>
              <view class="line">{{ delivery.endAddress }}</view>
            </view>
          </view>
        </navigator>
        <view class="footer">
          <view class="label">到货时间</view>
          <view class="time">{{ delivery.planArrivalTime }}</view>
          <navigator
            hover-class="none"
            :url="`/subpkg_task/delivery/index?id=${delivery.id}`"
            class="action"
          >
            交付
          </navigator>

        </view>
      </view>
      <view v-if="isEmpty" class="task-blank">无在途货物</view>
    </view>
  </scroll-view>
</template>
ScrollView:refresher-enabled="false"禁用自定义下拉刷新
1.3.2 任务详情
当任务状态处于在途时,已经完成了提货的操作,因此在详情面面需要展示提货时提交的照片。
<!-- subpkg_task/detail/index.vue -->
<script setup>
  //
</script>
<template>
  <view class="page-container">
		...
    <scroll-view scroll-y class="task-detail">
      <view class="scroll-view-wrapper">
				...
        <view v-if="taskDetail.status >= 2" class="panel pickup-info">
          <view class="panel-title">提货信息</view>
          <view class="label">提货凭证</view>
          <view class="pictures">
            <image
              v-for="receipt in taskDetail.cargoPictureList"
              :key="receipt.url"
              class="picture"
              :src="receipt.url"
            />
          </view>
          <view class="label">货品照片</view>
          <view class="pictures">
            <image
              v-for="goods in taskDetail.cargoPickUpPictureList"
              :key="goods.url"
              class="picture"
              :src="goods.url"
            />
          </view>
        </view>
				...
      </view>
    </scroll-view>
		...
  </view>
</template>
任务详情中的数据:
cargoPictureList提供凭证的照片cargoPickUpPictureList提货商品的照片
1.4 异常上报
异常上报是指司机在运输途中遇到的一些突发状况,这些突发状可能会导致运输到达时间有所延迟,司机需要将遇到的突发情况及时上报,方便管理端进行管理。
异常上报功能模块中包含交互相对要多一些,略为复杂一些,大家一定要耐心。
1.4.1 异常时间
异常时间的获取用到了 uni-app 的扩展组件 uni-datetime-picker 和 uni-list
v-model获取用户选择的时间v-slot:footer插槽用于自定义uni-list-item右侧展示的内容如果
uni-datetime-picker在展开时,显示的是英文模式,需要在manifest.json中设置语言{ "locale": "zh-CN" }
找到异常上报vue
<!-- subpkg_task/except/index.vue -->
<script setup>
  import { ref, computed } from 'vue'

  // 省略了中间部分代码...

  // 获取异常时间
  const exceptionTime = computed(() => {
    return timePicker.value || '请选择'
  })
  // 扩展组件时间初始值
  const timePicker = ref('')

</script>
<template>
  <view class="page-container">
    <scroll-view class="scroll-view" scroll-y>
      <view class="scroll-view-wrapper">
        <uni-list :border="false">
          <uni-list-item show-arrow title="异常时间">
            <template v-slot:footer>
              <uni-datetime-picker v-model="timePicker">
                <view class="picker-value">{{ exceptionTime }}</view>
              </uni-datetime-picker>
            </template>
          </uni-list-item>
					...
        </uni-list>
      </view>
    </scroll-view>
    ...
  </view>
</template>
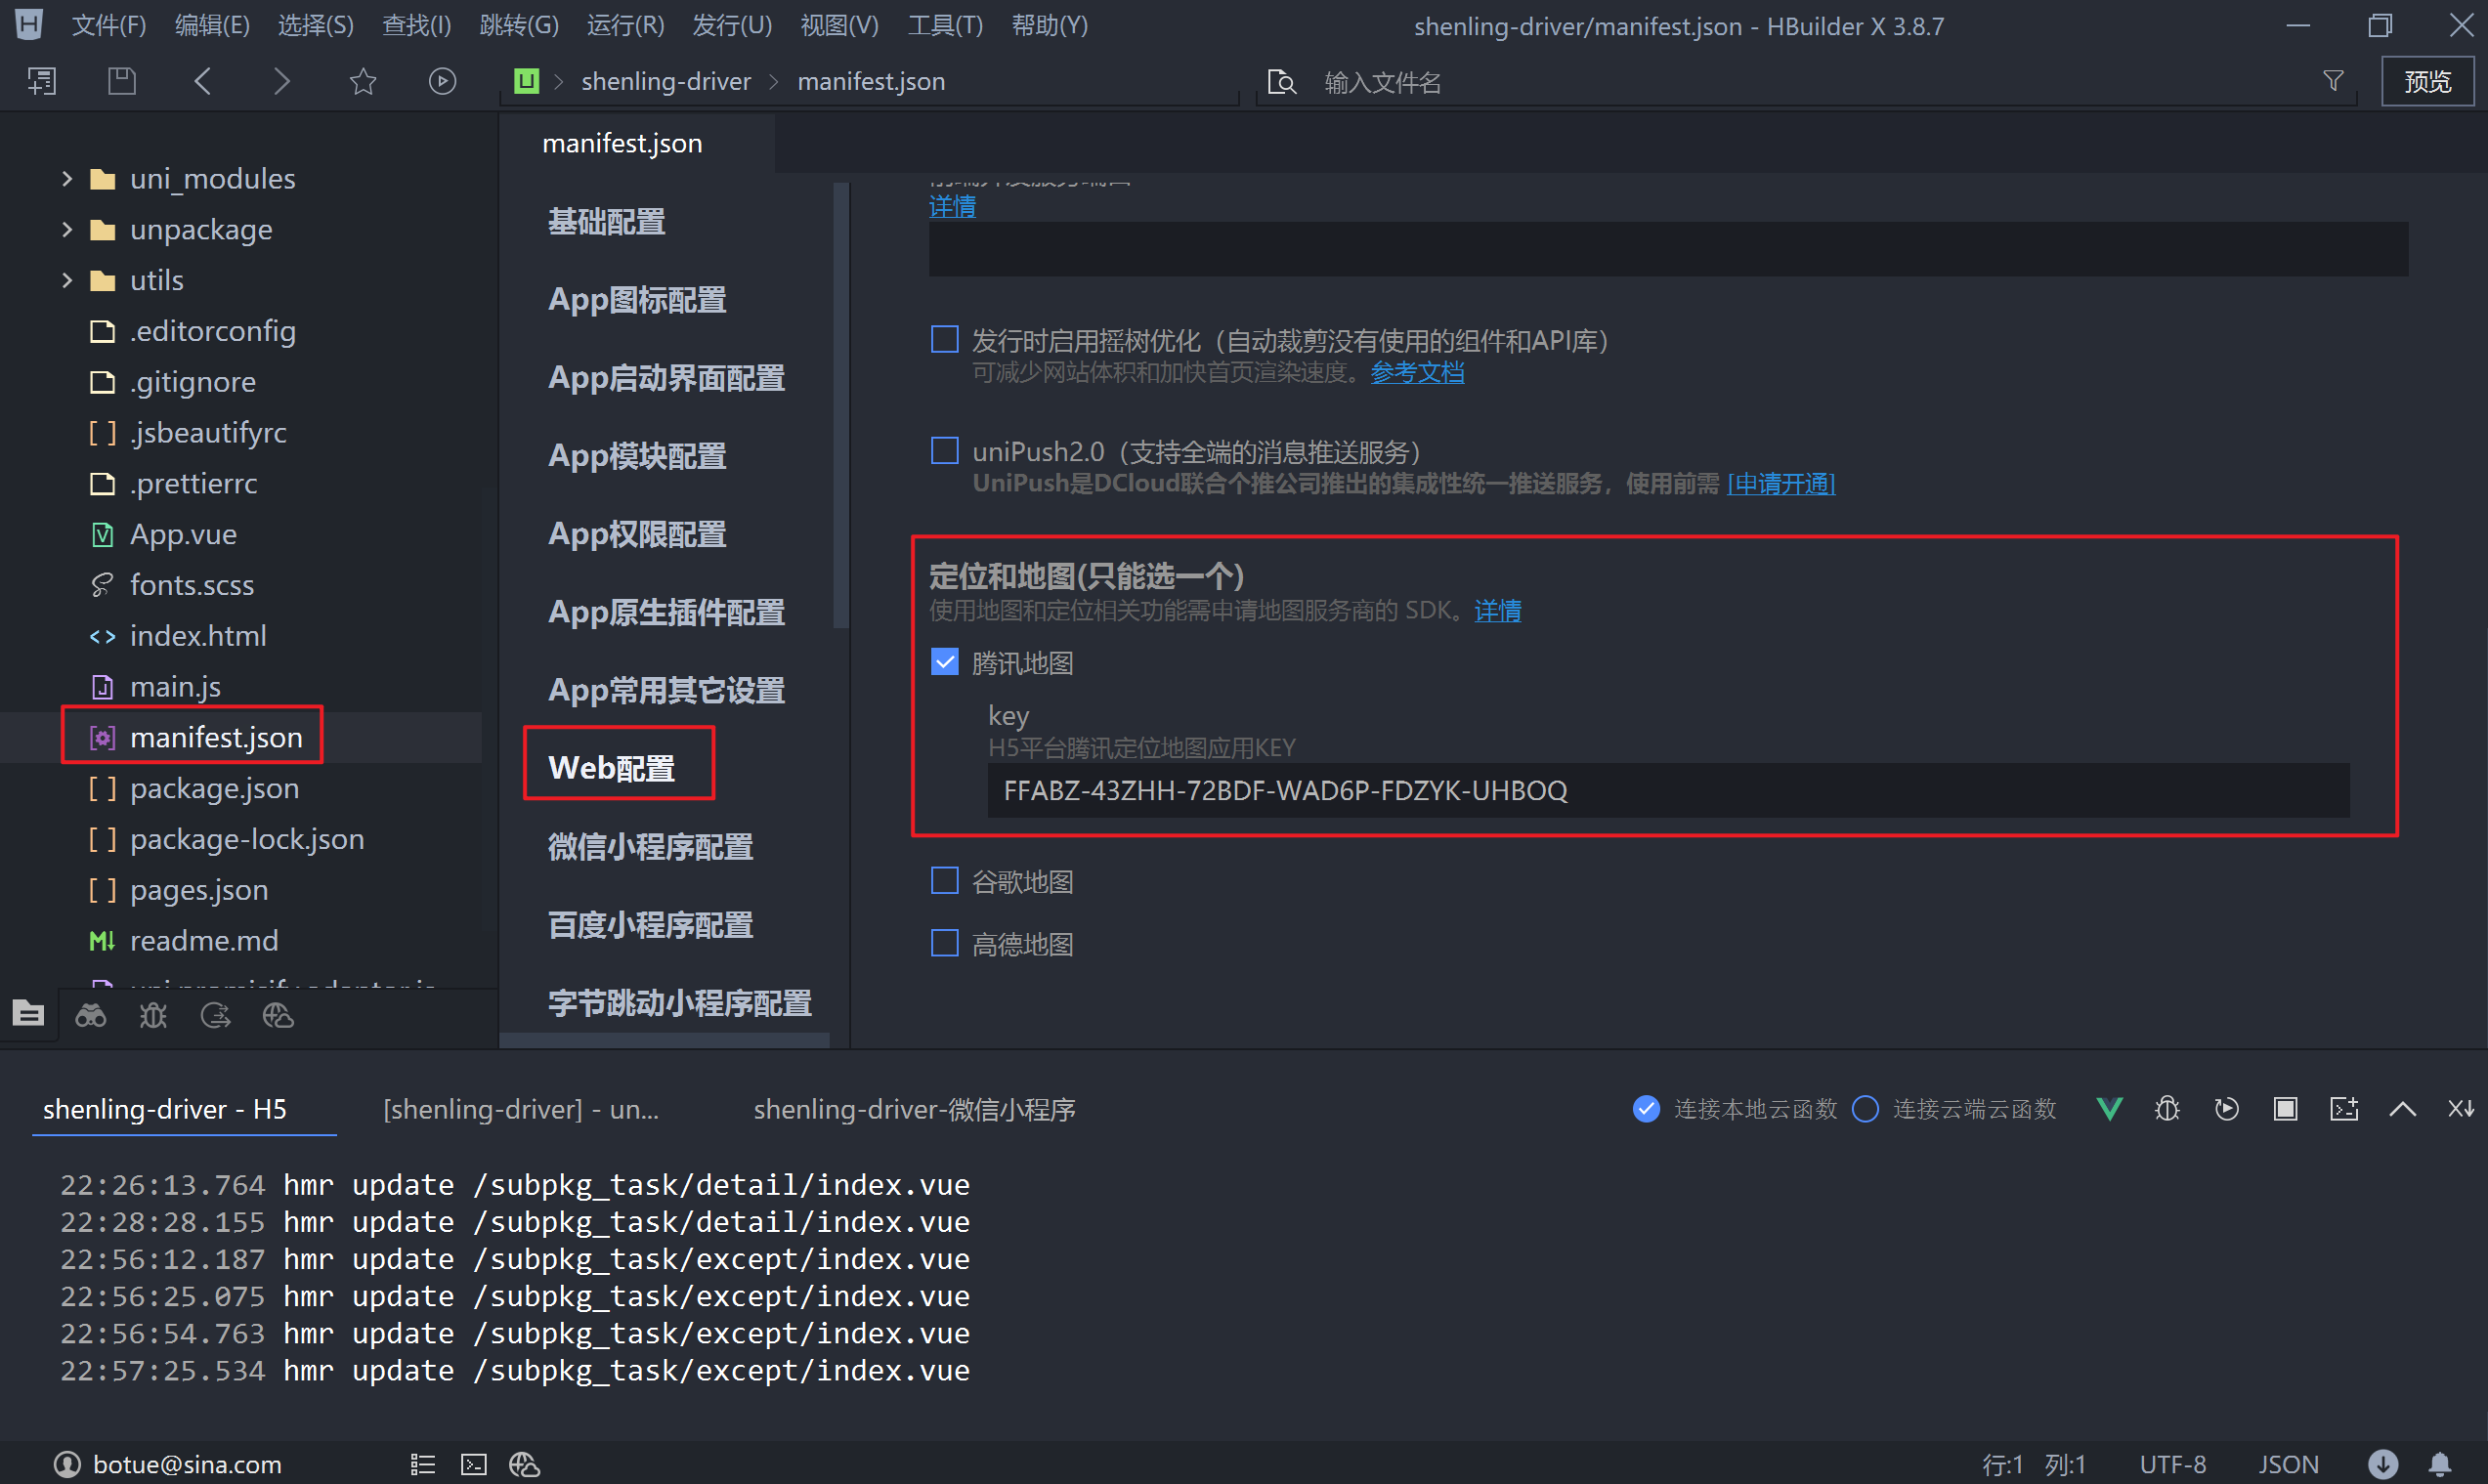
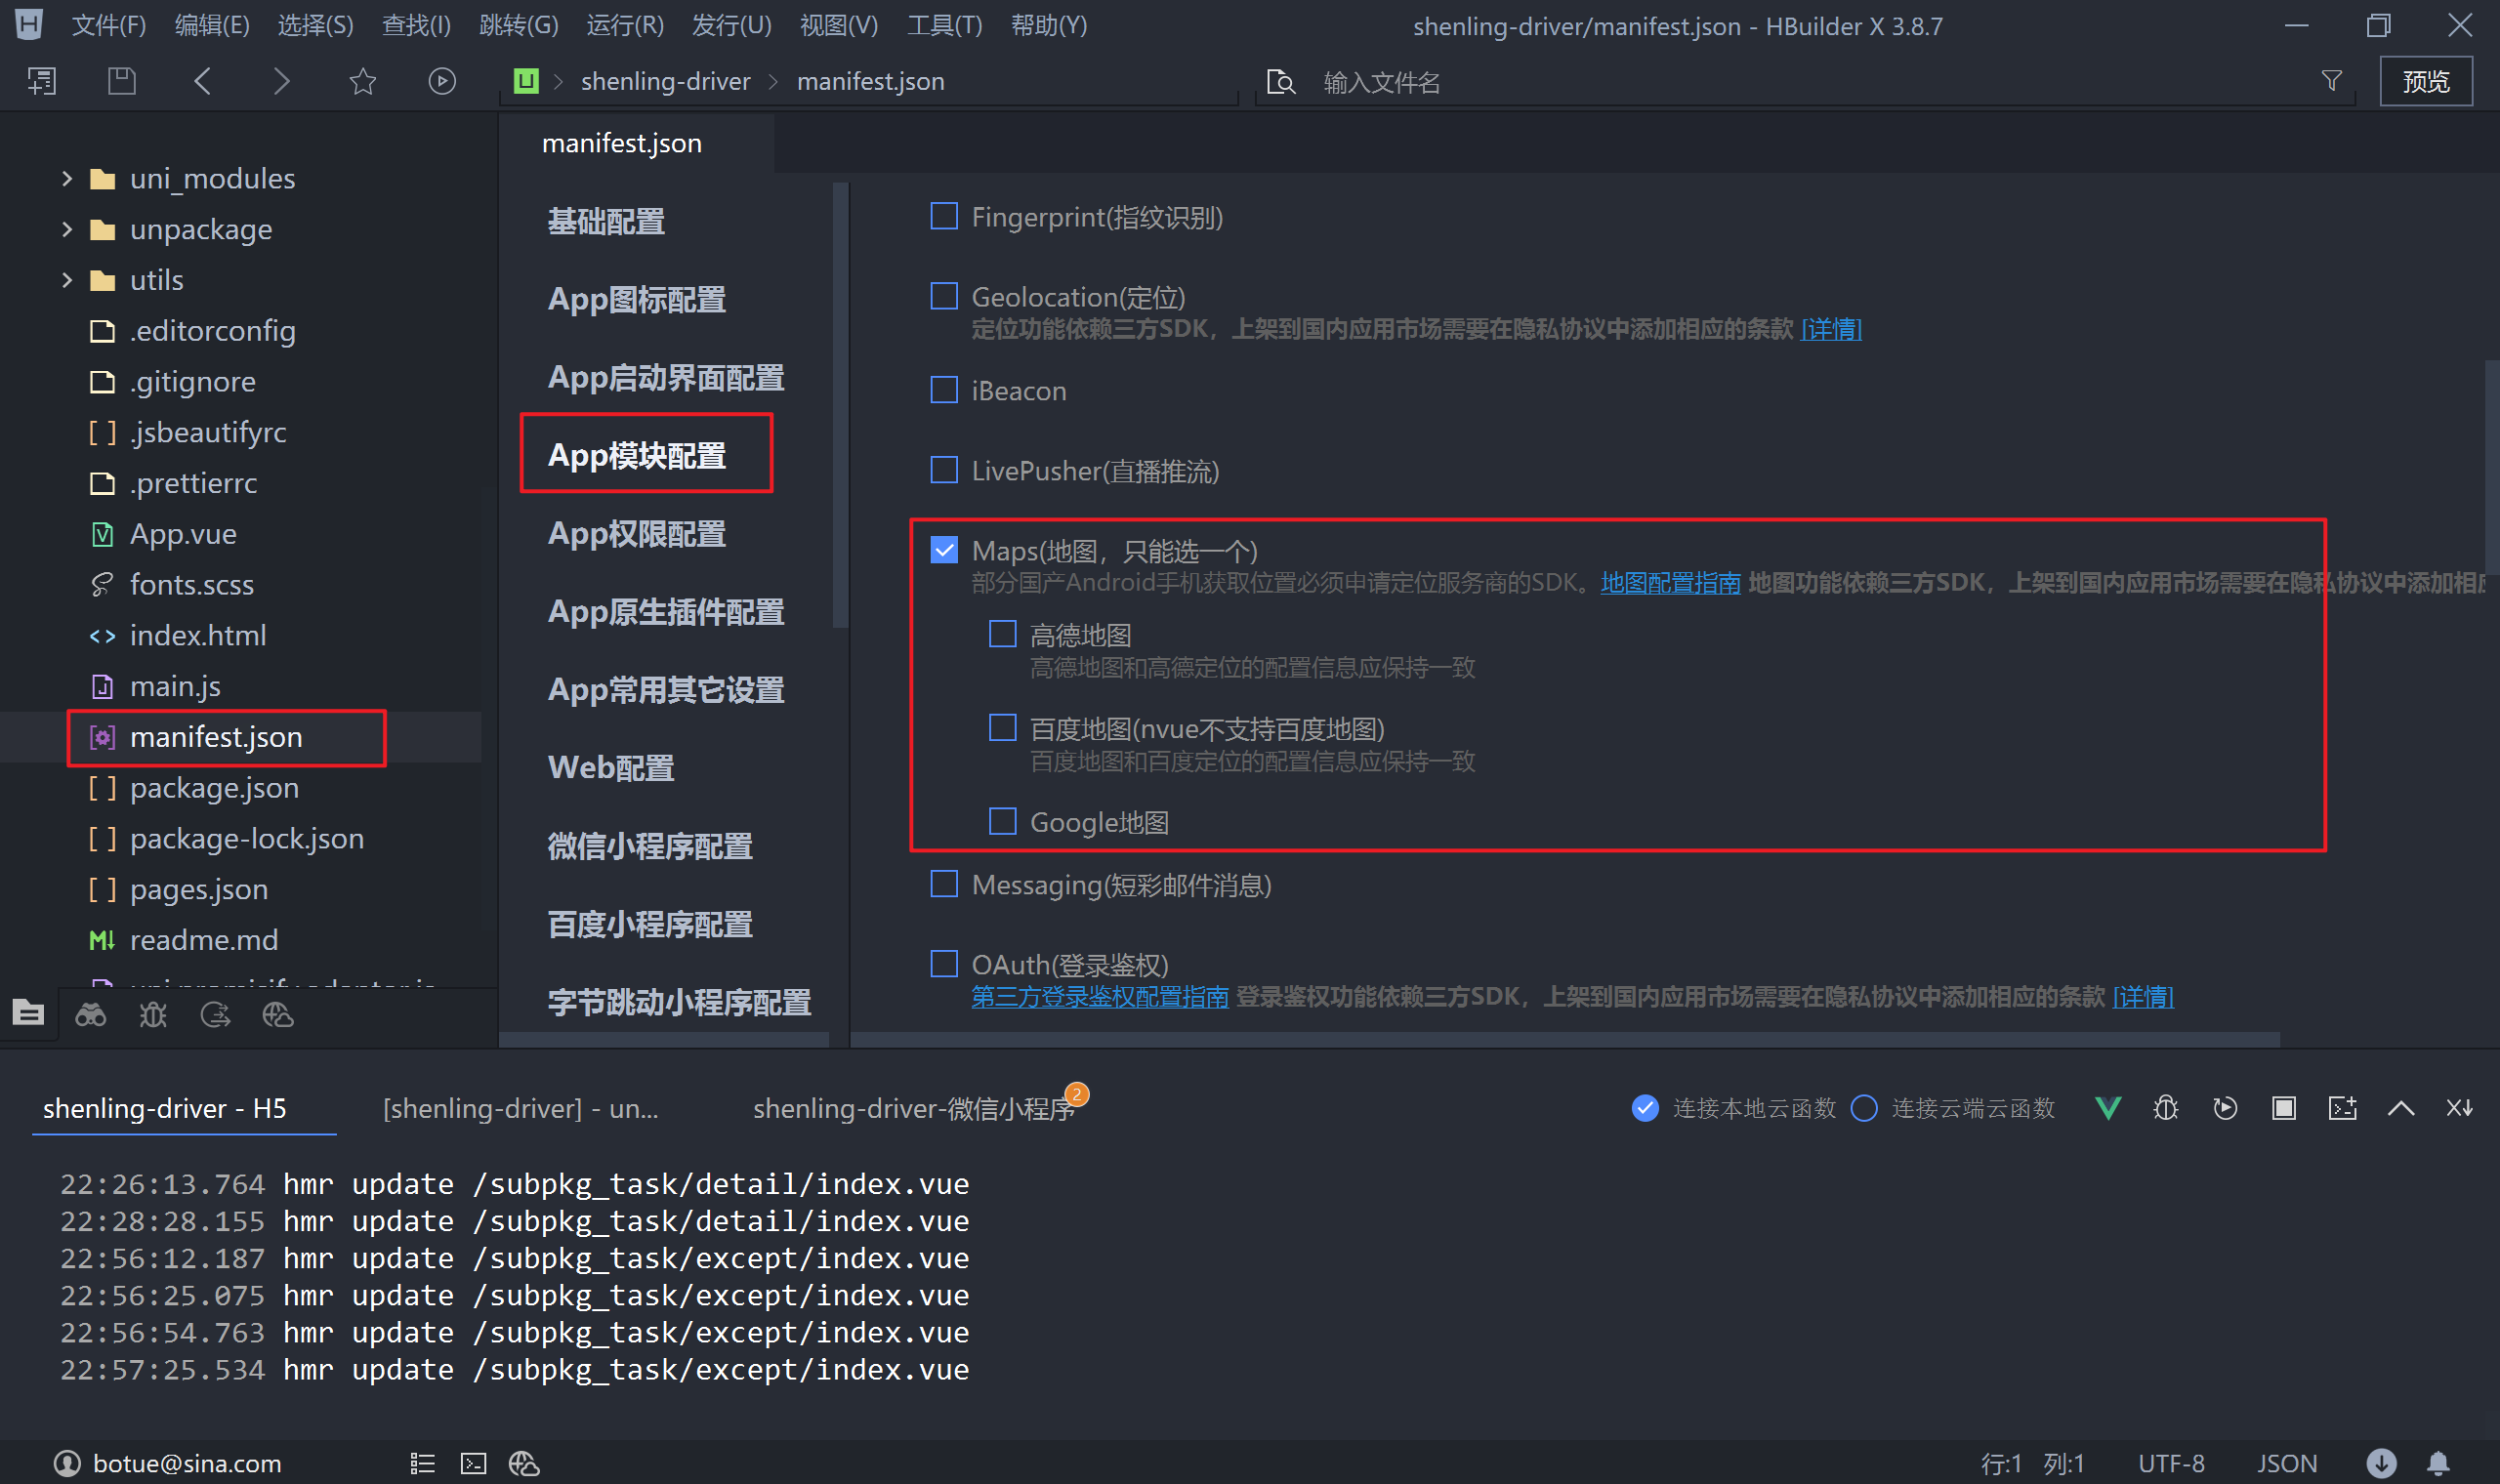
1.4.2 上报位置
上报位置需要调用 wx.chooseLocation 来获取用户所在位置信息,在 uni-app 中调用 wx.chooseLocation 时需要指定地图服务平台申请的 key,并且地图的使用存在一定的兼容性。
| 地图服务商 | App | H5 | 小程序 |
|---|---|---|---|
| 高德 | √ | √ | |
| 仅nvue页面 | √ | ||
| 腾讯 | √ | √ |
对比后我们选择腾讯位置服务平台,之前在享+生活中介绍过如何创建应用以及申请 key,这里文档就不再缀述了。
注:支持 App 端需要指定其它地图服务商,在课堂就不演示其注册的流程了,大家可自行注册并申请 key。
另外微信小程序要求在使用 wx.chooseLocation 位置接口时必须要通过 requiredPrivateInfos 进行配置,在 uni-app 中设置 requiredPrivateInfos 需要在 manifest.json 的源码视图中完成。
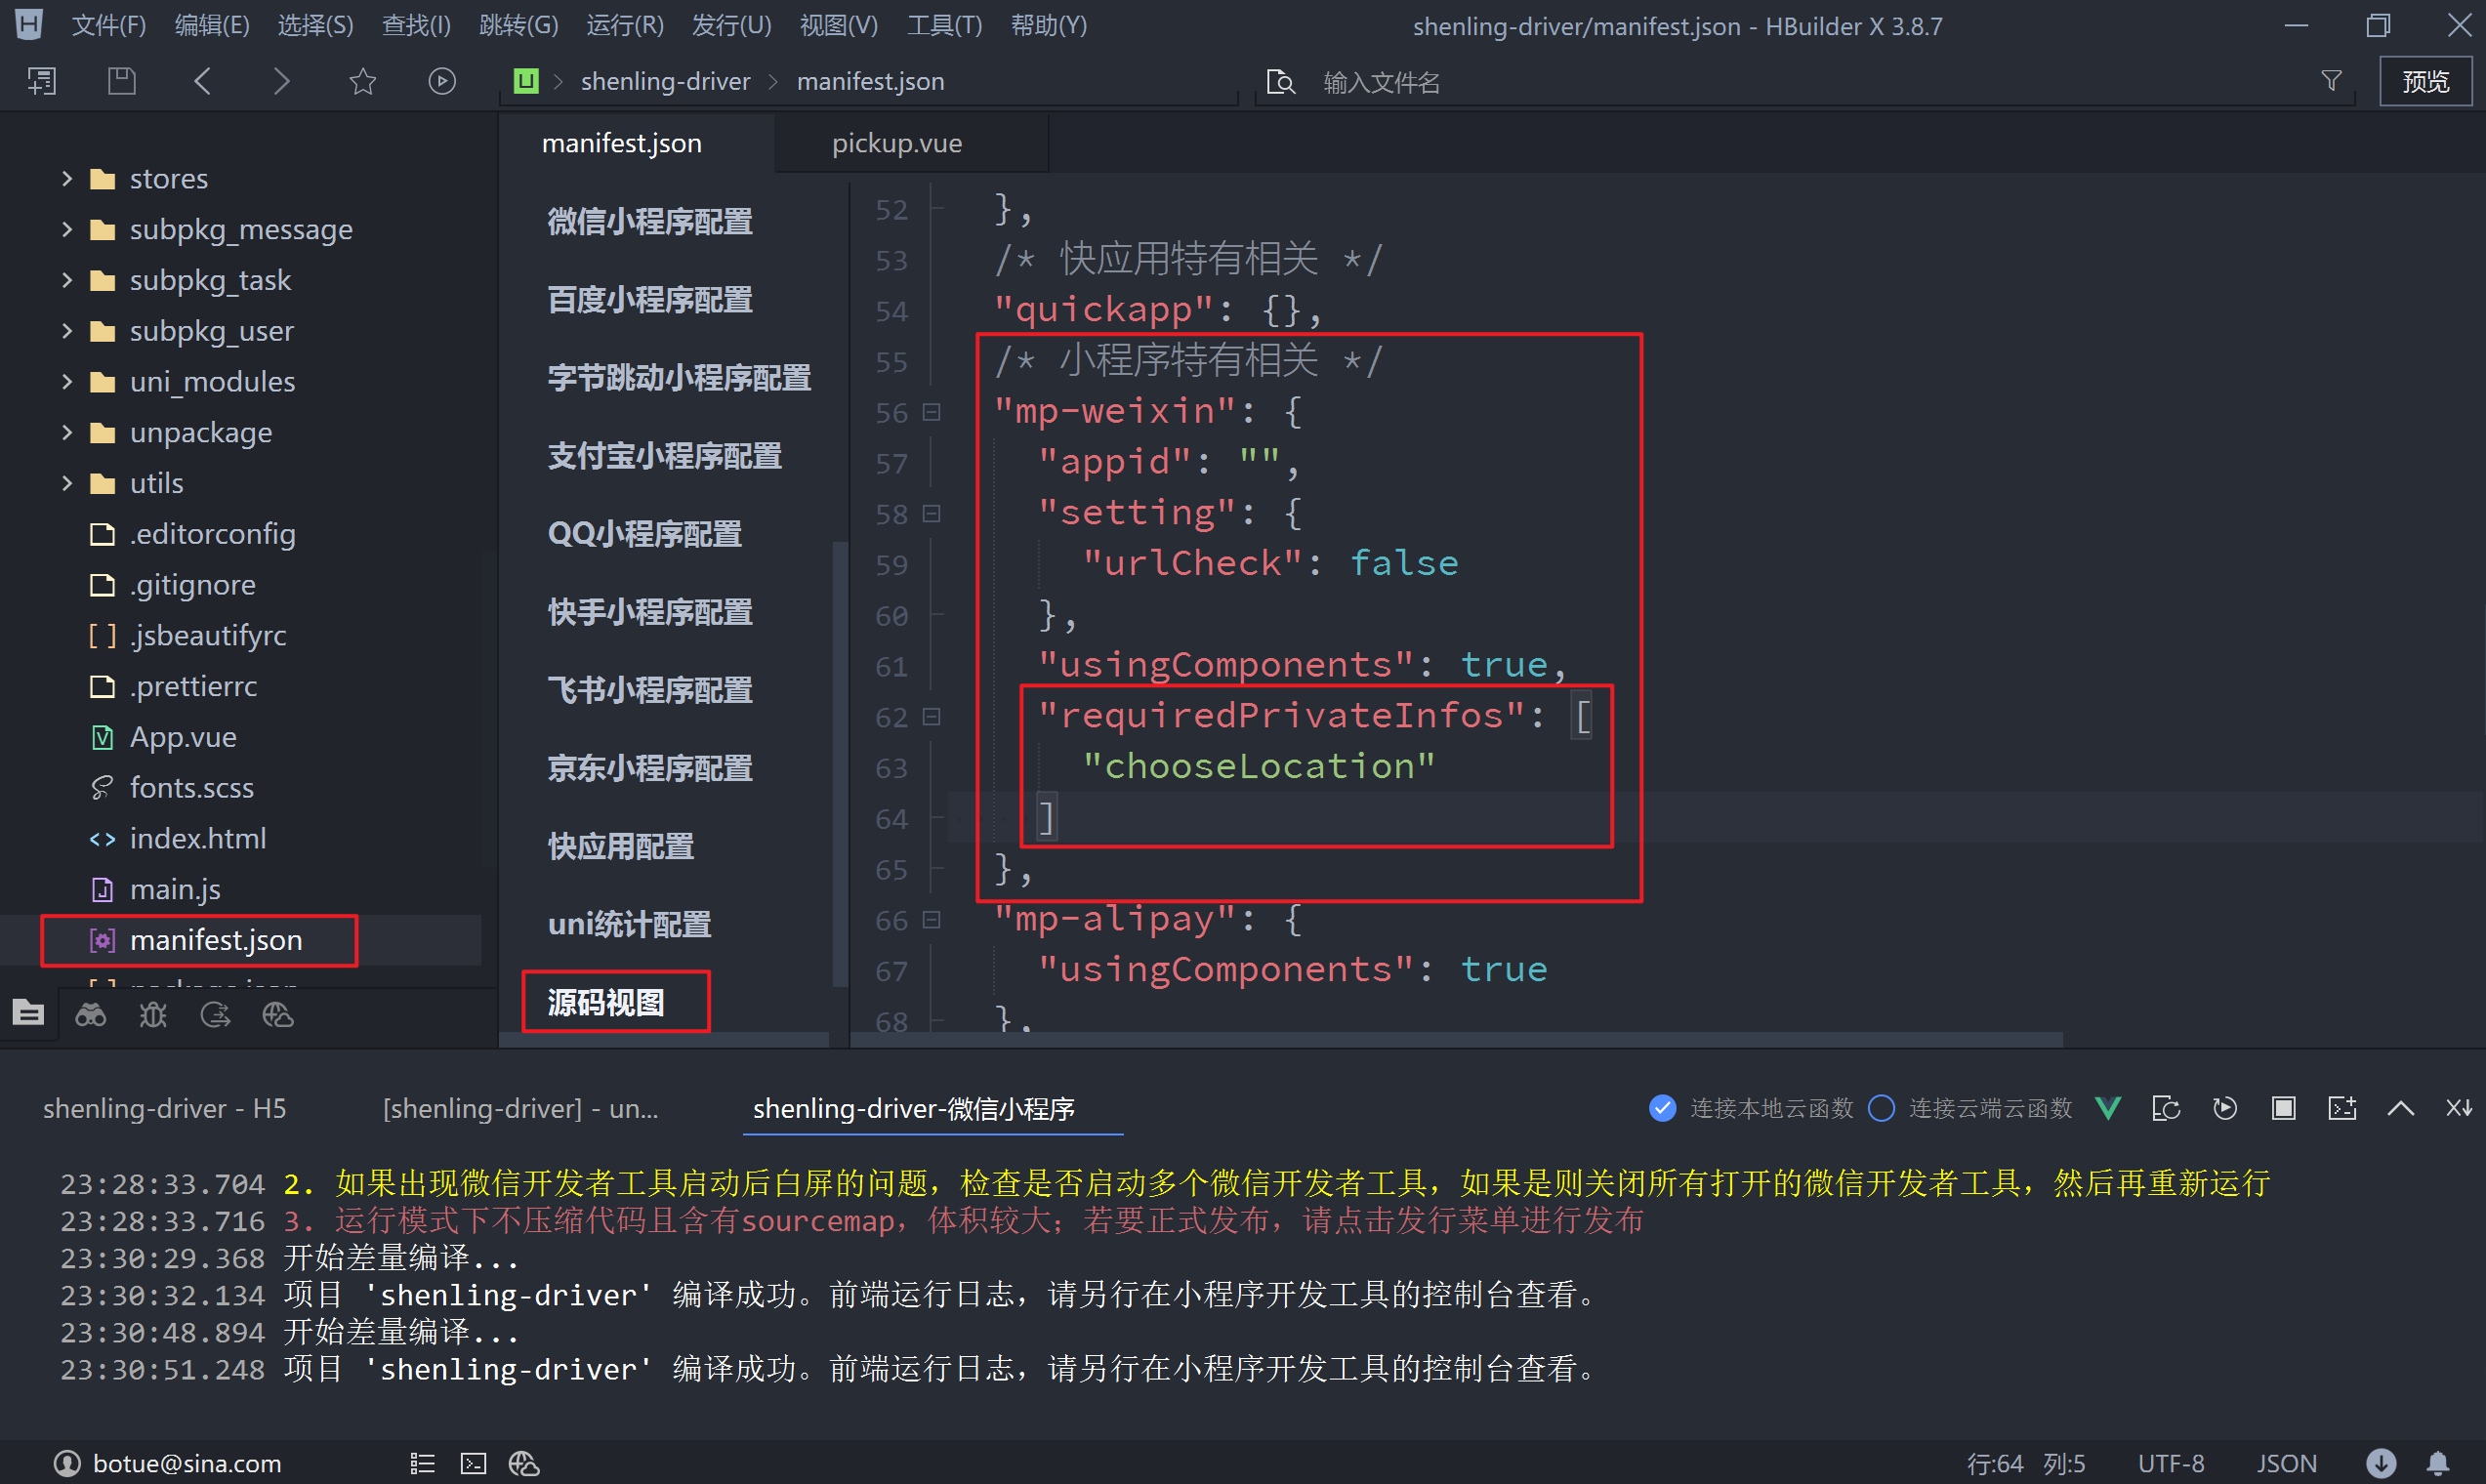
"mp-weixin": {
  	...
    "requiredPrivateInfos": ["chooseLocation"]
  }
以上均是相关的配置准备工作,目的是保证 uni.chooseLocation 能够成功调用
<!-- subpkg_task/except/index.vue -->
<script setup>
  import { ref, computed } from 'vue'

  // 省略中间部分代码...

  // 上报位置数据
  const exceptionPlace = ref('')
  // 打开地图,选择位置
  async function onLocationChoose() {
    try {
      // 获取位置
      const { address } = await uni.chooseLocation({})
      exceptionPlace.value = address
    } catch (err) {}
  }

  // 省略中间部分代码...
</script>
<template>
  <view class="page-container">
    <scroll-view class="scroll-view" scroll-y>
      <view class="scroll-view-wrapper">
        <uni-list :border="false">
          ...
					<uni-list-item
            show-arrow
            clickable
            ellipsis="1"
            @click="onLocationChoose"
            title="上报位置"
            :right-text="exceptionPlace || '请选择'"
          />
        </uni-list>
      </view>
    </scroll-view>
    ...
  </view>
</template>
1.4.3 异常类型
异常类型使用到了uni-app的扩展组件 uni-popup。
- 在实现相关逻辑之前先来整理下
uni-popup所展示的数据
<!-- subpkg_task/except/index.vue -->
<script setup>
  import { ref, computed, reactive } from 'vue'

  // 省略中间部分代码...

    // 定义 popup 组件展示的数据
  const exceptionTypes = reactive([
    '发动机启动困难',
    '不着车,漏油',
    '照明失灵',
    '排烟异常、温度异常',
    '其他问题',
  ])

  // 省略中间部分代码...

</script>

<template>
  <view class="page-container">
    ...
    <uni-popup ref="popup" type="bottom">
      <uni-list class="popup-action-sheet">
        ...
        <uni-list-item
          v-for="exceptionType in exceptionTypes"
          :key="exceptionType"
          :title="exceptionType"
        >
          <template v-slot:footer>
            <checkbox-group class="checkbox">
              <checkbox :value="exceptionType" color="#EF4F3F" />
            </checkbox-group>
          </template>
        </uni-list-item>
        ...
      </uni-list>
    </uni-popup>
  </view>
</template>
- 选择并获取异常的类型,允许多选,选项之间使用
|拼接
在用户选择了 checkbox 内置组件后会触发 change 事件,进而获取所选择的内容,由于允许多选所以先将用户选择的异常类型存一个临时数组中,当用户在点击确定时再将这个临时数组使用 | 拼凑成一个字符串。
- 将用户选择的异常类型存入数组,注意
change事件要监听在checkbox-group组件上
<!-- subpkg_task/except/index.vue -->
<script setup>
  import { ref, computed } from 'vue'

  // 省略中间部分代码...

    // 定义 popup 组件展示的数据
  const exceptionTypes = reactive([
    '发动机启动困难',
    '不着车,漏油',
    '照明失灵',
    '排烟异常、温度异常',
    '其他问题',
  ])

  // 临时记录异常类型选项(可以不必是响应式)
  const tempException = []
  // 监听用户的选择操作
  function onCheckboxChange(ev) {
    // 将用户选择的异常类型存储到数组中
    tempException.push(ev.detail.value)
  }

  // 省略中间部分代码...

</script>

<template>
  <view class="page-container">
    ...
    <uni-popup ref="popup" type="bottom">
      <uni-list class="popup-action-sheet">
        ...
        <uni-list-item
          v-for="exceptionType in exceptionTypes"
          :key="exceptionType"
          :title="exceptionType"
        >
          <template v-slot:footer>
            <checkbox-group @change="onCheckboxChange" class="checkbox">
              <checkbox :value="exceptionType" color="#EF4F3F" />
            </checkbox-group>
          </template>
        </uni-list-item>
        ...
      </uni-list>
    </uni-popup>
  </view>
</template>
- 在用户点击弹层
uni-popup上的按钮后,不仅要关闭弹层还要将用户选择的异常类型使用|拼凑成字符串
<!-- subpkg_task/except/index.vue -->
<script setup>
  import { ref, computed } from 'vue'

  // 省略中间部分代码...

    // 定义 popup 组件展示的数据
  const exceptionTypes = reactive([
    '发动机启动困难',
    '不着车,漏油',
    '照明失灵',
    '排烟异常、温度异常',
    '其他问题',
  ])

  // 异常类型,多个选项间使用 | 拼接
  const exceptionType = ref('')

  // 临时记录异常类型选项(可以不必是响应式)
  const tempException = []
  // 监听用户的选择操作
  function onCheckboxChange(ev) {
    // 将用户选择的异常类型存储到数组中
    tempException.push(ev.detail.value)
  }

  // 用户点击 popup 确定按钮
  function onPopupConfirm() {
    // 关闭 popup 弹层
    popup.value.close()
    // 将获取的异常类型拼凑成字符串
    exceptionType.value = tempException.join('|')
  }

  // 省略中间部分代码...

</script>

<template>
  <view class="page-container">
    <scroll-view class="scroll-view" scroll-y>
      <view class="scroll-view-wrapper">
        <uni-list :border="false">
    			...
          <uni-list-item
            show-arrow
            clickable
            @click="onPopupOpen"
            title="异常类型"
            :right-text="exceptionType || '请选择'"
          />
  			</uni-list>
  		</view>
  	</scroll-view>
    ...
    <uni-popup ref="popup" type="bottom">
      <uni-list class="popup-action-sheet">
        ...
        <uni-list-item>
          <template v-slot:body>
            <button @click="onPopupConfirm" class="button">确定</button>
          </template>
        </uni-list-item>
      </uni-list>
    </uni-popup>
  </view>
</template>
=======================================================================================
上述代码存在着bug,下面代码部分为修复优化的代码,只保留了与切换选中状态相关的代码
=======================================================================================
<!-- subpkg_task/except/index.vue -->
<script setup>
  import { ref, computed, reactive } from 'vue'
  import { onLoad } from '@dcloudio/uni-app'
  import taskApi from '@/apis/task'

  // 组件 ref
  const popup = ref(null)
  // 异常日期
  const timePicker = ref('')

  // 定义 popup 组件展示的数据
  const exceptionTypes = reactive([
    { text: '发动机启动困难', checked: true },
    { text: '不着车,漏油', checked: false },
    { text: '照明失灵', checked: false },
    { text: '排烟异常、温度异常', checked: false },
    { text: '其他问题', checked: false },
  ])

	// 省略中间部分代码...

  // 异常的类型
  const exceptionType = ref('')

	// 省略中间部分代码...

  // 监听用户选择类型
  function onCheckboxChange(index) {
    // 切换选中状态
    exceptionTypes[index].checked = !exceptionTypes[index].checked
  }

	// 省略了中间部分代码...

  // 关闭弹层
  function onPopupClose() {
    popup.value.close()

    // 获取用户选择的类型并回显到页面,即将 checked 属性为 true 单元取出
    exceptionType.value = exceptionTypes
      .filter((type) => {
        return type.checked // 过滤出选中的类型
      })
      .map((type) => {
        return type.text // 只保留 text 属性
      })
      .join('|') // 将选择的类型用 | 拼接并回显
  }
</script>
由于改变了 exceptionTypes 数组的结构,与之对应的模板也要相对应的调整
<!-- subpkg_task/except/index.vue -->
<template>
  <view class="page-container">
		...
    <uni-popup ref="popup" type="bottom">
      <uni-list class="popup-action-sheet">
				...
        <uni-list-item
          v-for="(exceptionType, index) in exceptionTypes"
          :key="exceptionType.text"
          :title="exceptionType.text"
        >
          <template v-slot:footer>
            <checkbox-group @change="onCheckboxChange(index)" class="checkbox">
              <checkbox :checked="exceptionType.checked" color="#EF4F3F" />
            </checkbox-group>
          </template>
        </uni-list-item>
        <uni-list-item>
          <template v-slot:body>
            <button @click="onPopupClose" class="button">确定</button>
          </template>
        </uni-list-item>
      </uni-list>
    </uni-popup>
  </view>
</template>
1.4.4 异常描述
在获取异常描述时只需要通过 v-model 即可,同时对异常描述的字数进行统计。
<!-- subpkg_task/except/index.vue -->
<script setup>
  import { ref, computed } from 'vue'

  // 省略中间部分代码...

  // 异常描述
  const exceptionDescribe = ref('')
  // 异常描述字数统计
  const wordsCount = computed(() => {
    return exceptionDescribe.value.length
  })

  // 省略中间部分代码...

</script>
<template>
  <view class="page-container">
    <scroll-view class="scroll-view" scroll-y>
      <view class="scroll-view-wrapper">
        <uni-list :border="false">
    			...
					<uni-list-item direction="column" title="异常描述">
            <template v-slot:footer>
              <view class="textarea-wrapper">
                <textarea
                  v-model="exceptionDescribe"
                  class="textarea"
                  placeholder="请输入异常描述"
                /></textarea>
                <view class="words-count">{{ wordsCount }}/50</view>
              </view>
            </template>
          </uni-list-item>
  			</uni-list>
  		</view>
  	</scroll-view>
    ...
  </view>
</template>
注:异常描述的字数限制为50,关于字数的验证在延迟提货的章节已经实现过了,大家可以去参考下。
1.4.5 现场照片
获取现场照片需要司机上传图片到云存储,然后将云存储中的图片地址发送给服务端接口,该部分的实现逻辑与提货是一致的。
<!-- subpkg_task/except/index.vue -->
<script setup>
  import { ref, computed } from 'vue'

  // 省略中间部分代码...

  // 货品图片
  const goodsPictrues = ref([])
  // 数据二次处理,只保留 url 属性
  const exceptionImagesList = computed(() => {
    return goodsPictrues.value.map(({ url }) => {
      return { url }
    })
  })

  // 省略中间部分代码...

</script>
<template>
  <view class="page-container">
    <scroll-view class="scroll-view" scroll-y>
      <view class="scroll-view-wrapper">
        ...
        <uni-list class="upload-picture">
          <uni-list-item direction="column" title="上传图片(最多3张)">
            <template v-slot:footer>
              <uni-file-picker
                v-model="goodsPictrues"
                file-extname="jpg,webp,gif,png"
                limit="3"
              ></uni-file-picker>
            </template>
          </uni-list-item>
        </uni-list>
  		</view>
  	</scroll-view>
    ...
  </view>
</template>
1.4.6 提交数据
将全部的异常数据获取完毕后提交数据给服务端接口,接口文档的详细说明在这里。
在提交数据,这里,我遇到,如果项目在浏览器运行的是192.168.x.x,那么图片上传云函数,会存在跨域问题,需要uniCloud按文档,Web中使用uniCloud的跨域处理。如果在浏览器运行的是localhost或127.0.0.1,图片上传云函数没有问题,但是上报位置选择,地图选择失效。故此,在这里提交数据,要以ip访问,或者在HBuilderX,内置浏览器访问。
- 封装调用接口的方法
// apis/task.js
// 引入网络请求模块
import { uniFetch } from './uni-fetch'

export default {
  // 省略中间部分代码...

  /**
   * 上报异常
   * @param {Object} data - 接口数据
   */
  except(data) {
    return uniFetch.post('/driver/tasks/reportException', data)
  }
}
- 监听用户点击提交按钮
<!-- subpkg_task/except/index.vue -->
<script setup>
  import { ref, computed, reactive } from 'vue'
  import { onLoad } from '@dcloudio/uni-app'
  import taskApi from '@/apis/task'

  // 中间省略部分代码...

  // 运输任务ID
  const transportTaskId = ref('')
  onLoad((query) => {
    transportTaskId.value = query.transportTaskId
  })

  // 中间省略部分代码...

  // 提交数据
  async function onFormSubmit() {
    // 待提交的数据
    const formData = {
      transportTaskId: transportTaskId.value,
      exceptionTime: exceptionTime.value,
      exceptionPlace: exceptionPlace.value,
      exceptionType: exceptionType.value,
      exceptionDescribe: exceptionDescribe.value,
      exceptionImagesList: exceptionImagesList.value,
    }
    const { code } = await taskApi.except(formData)
    // 检测接口是否调用成功
    if (code !== 200) return uni.utils.toast('上报数据失败!')
    // 跳转到任务列表页面
    uni.reLaunch({ url: '/pages/task/index' })
  }

  // 省略中间部分代码...

</script>
<template>
  <view class="page-container">
    <scroll-view class="scroll-view" scroll-y>
      ...
  	</scroll-view>
    <view class="fixbar">
      <button @click="onFormSubmit" class="button disable">提交</button>
    </view>
    ...
  </view>
</template>
1.4.7 任务详情
司机上报异常后,到任务详情当中即可看到上报的异常信息,我来到任务详情中来补充这部分数据的显示
<!-- subpkg_task/detail/index.vue -->
<script setup>
  //
</script>
<template>
  <view class="page-container">
		...
    <scroll-view scroll-y class="task-detail">
      <view class="scroll-view-wrapper">
				...
        <view v-if="taskDetail.exceptionList" class="except-info panel">
          <view class="panel-title">异常信息</view>
          <view
            v-for="exception in taskDetail.exceptionList"
            :key="exception.exceptionType"
            class="info-list"
          >
            <view class="info-list-item">
              <text class="label">上报时间</text>
              <text class="value">{{ exception.exceptionTime }}</text>
            </view>
            <view class="info-list-item">
              <text class="label">异常类型</text>
              <text class="value">{{ exception.exceptionType }}</text>
            </view>
            <view class="info-list-item">
              <text class="label">处理结果</text>
              <text class="value">{{ exception.handleResult }}</text>
            </view>
          </view>
        </view>
				...
      </view>
    </scroll-view>
		...
  </view>
</template>
由于异常数据可能有也可能没有,因此在进行渲染前需要通过 v-if 条件判断,exceptionList 对应上报的异常数据。